
Education & Resources
Helping Your Pet Have a Positive Experience at the Vet
For many animals, a trip to the veterinary clinic can be stressful and anxiety-inducing. Unfamiliar smells, new people, other animals, and past experiences can all contribute to a pet feeling nervous or fearful during their visit.
At Columbia Valley Veterinary Clinic, we do everything we can to make each visit as calm and positive as possible. One tool we may recommend to help reduce stress is what we call the “Chill Protocol.”
What Is a Chill Protocol?
The Chill Protocol is a set of pre-visit medications that can be given to your pet before their appointment to help them feel calmer and more relaxed at the clinic.
These medications are carefully selected based on your pet’s individual needs. Some pets experience mild nervousness, while others may have significant anxiety related to veterinary visits. Because of this, each protocol is customized—there is no one-size-fits-all approach.
Pre-appointment medications are designed to:
Reduce anxiety and fear associated with veterinary visits
Help pets feel calmer and more comfortable during handling and examinations
Create a more positive experience for both pets and their owners
Allow our veterinary team to safely and gently perform necessary care
Importantly, these medications are not intended to fully sedate your pet. Instead, they help take the edge off anxiety so your pet can better cope with the visit.
Why Reducing Stress Matters
When pets are frightened, their bodies enter a “fight, flight, or freeze” state. This can make examinations more difficult and may increase fear during future visits.
By reducing anxiety ahead of time, we can:
Improve your pet’s comfort and wellbeing
Make exams and procedures less stressful
Help build positive associations with veterinary care
Keep both pets and staff safer during handling
Our goal is always to make veterinary visits as positive and low-stress as possible.
Timing Matters
Pre-visit medications are time-sensitive, and proper timing is important for them to work effectively.
Depending on your pet’s protocol, medications may be given:
The night before the appointment
The morning of the appointment
30–90 minutes prior to arrival at the clinic
If your pet’s protocol includes a dose the night before, we often schedule earlier morning appointments. This helps ensure the medications are working optimally and allows us to give additional doses if needed to maintain their calming effect.
Our team will provide clear instructions on exactly when and how to administer your pet’s medications.
Long-Term Anxiety Support
For some pets, anxiety may not only occur during vet visits but also in everyday situations. In these cases, long-term support options may be more appropriate.
These may include:
Daily anti-anxiety medications
Calming supplements
Behavioural support and training strategies
Environmental enrichment
Pre-visit medications are typically used as needed for stressful events, while long-term options focus on improving your pet’s overall emotional wellbeing.
We’re Here to Help
If your pet becomes anxious during veterinary visits, you’re not alone—and there are ways we can help.
Our team is happy to discuss whether a Chill Protocol or other anxiety-reducing strategies may be beneficial for your pet.
If you have any questions about pre-visit medications or long-term anxiety support, please don’t hesitate to reach out to our team at Columbia Valley Veterinary Clinic.
We look forward to seeing you and your pet soon—and helping make every visit a more comfortable experience.
One Small Ligament, One Big Limp; Understanding Cruciate Tears in Dogs
In dogs, an ACL tear refers to a rupture of the cranial cruciate ligament (CCL) in the knee (stifle). It’s one of the most common orthopedic injuries in dogs and can cause pain, instability, and lameness.
What the Cranial Cruciate Ligament Does
The CCL stabilizes the knee joint by:
Preventing the tibia from sliding forward under the femur
Limiting internal rotation of the knee
Helping maintain overall joint stability during movement
When this ligament tears or ruptures, the knee becomes unstable and painful.
What dogs are at risk?
Dogs at higher risk of developing CCL rupture include:
Overweight dogs
Dogs that are spayed or neutered before skeletal maturity
Certain breeds: Rottweilers, German Shepherds, Labrador Retrievers, Boxers, and Bichon Frise.
This breed disposition is thought to have a genetic component (inherited from the parents).
Conformation of the knee joint: luxating patella’s, bully breeds (Staffordshire Bull Terrier)
Canine CCL is a degenerative disease – what does that mean?
50% of dogs have a history of slowly progressive lameness.
Partial tears are very common.
X-rays may show bony changes indicative of osteoarthritis before instability is evident.
22–80% of dogs may rupture both CCLs (bilateral CCL rupture).
What are the clinical signs of CCL rupture?
Carrying a leg or "toe-touching"
Walking with stifle (knee) abnormally flexed or externally rotated
Sitting abnormally (one leg extended or sitting on hip)
Stifle joint effusion (swelling)
How is CCL rupture diagnosed?
Swelling at the stifle (knee)
Pain on manipulation of the stifle
Sedated orthopedic examination (cranial drawer or tibial thrust tests)
Radiographs (x-rays)
assess for effusion, displacement, and osteoarthritic changes in the stifle
rule out other changes in the hips and back
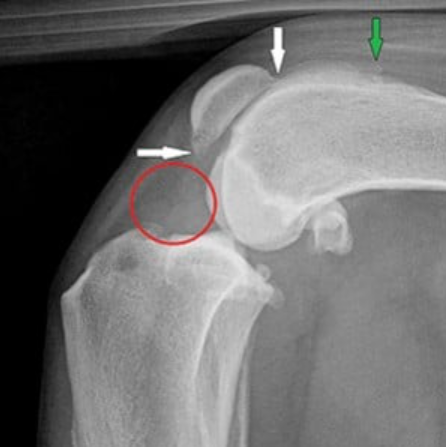
Osteoarthritis (white and green arrows) and joint fluid (red circle) indicative of cruciate rupture. Image credit: TVP
Treatment Options
Medical / Conservative Management
Best combined with TPLO surgery but may be used alone.
Success rates: Dogs <15 kg: 50–85%; Dogs >15 kg: 20–75%.
Partial tears respond better than complete ruptures, but may progress.
Weight loss is essential to reduce osteoarthritis risk.
Physical rehabilitation should be guided by your veterinarian; improper exercises may worsen the injury. Potential exercises include swimming, passive range of motion, “sit to stands,” toe pinches, and weight shifting.
Rough physical therapy timeline:
Weeks 1–4: Protection/rest
Weeks 5–8: Early strength training
Weeks 9–12: Intense strength training
Weeks 13–16: Return to normal activity
Pain control: Anti-inflammatories (e.g., Meloxicam) or neuropathic pain medications (e.g., Gabapentin) may be used. Overuse can lead to further damage if the dog becomes too active.
Knee braces/orthotics: Should be custom-engineered for the dog’s anatomy and biomechanics, rather than being a simple off-the-shelf support.
Better joint alignment
Reduced risk of pressure sores
More effective stabilization of the knee
Resources:
Surgical Repair (TPLO – Tibial Plateau Leveling Osteotomy)
Surgical Repair (TPLO – Tibial Plateau Leveling Osteotomy)
Gold standard for CCL rupture, especially in large dogs.
Success rate: 85–93%, with faster recovery than other methods.
Surgery alters the tibial plateau angle, inserts a plate for stability, and reduces osteoarthritis progression.
Recovery: Normal activities by ~4 months; full recovery ~6 months.
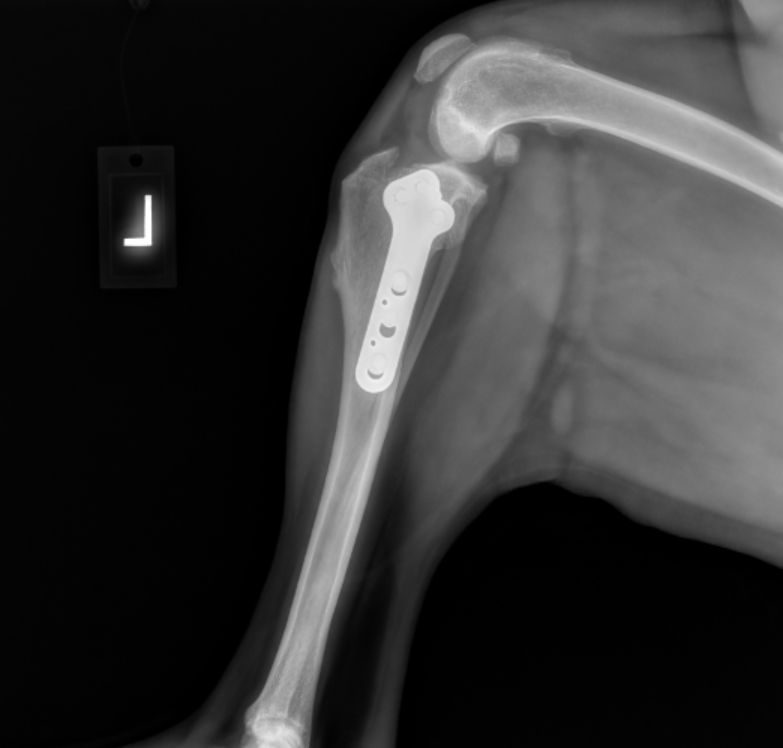
Image: Surgical repair of CCL tear using TPLO technique.
Joint Support – Essential for All Dogs
Whether you choose surgical or conservative management, all dogs should receive lifelong joint support to protect cartilage and reduce pain.
Omega-3 fatty acids:
EPA: 90 mg/kg/day
DHA: 20 mg/kg/day
Alternatively, 310 mg/kg^0.75/day of omega-3s
These doses have been shown to significantly improve pain and quality of life.
Joint supplements: Should include glucosamine, chondroitin, MSM, green-lipped mussel, etc.
Products like Aventi Omega-3 and Aventi Joint Complete contain clinically effective doses and comprehensive nutraceutical support.
Cartrophen Vet is a different form of joint support given as weekly injections under the skin for 4 weeks, followed by monthly maintenance injections.
It works by:
Protecting cartilage by slowing its breakdown
Stimulating cartilage repair and supporting joint health
Improving synovial (joint) fluid, allowing joints to move more smoothly
Reducing inflammation and pain
Improving blood supply to joint tissues
Spring is almost here… and so is allergy season!
Did you know allergies are one of the most common causes of ear infections in dogs? When allergies flare up, inflammation in the skin and ears can create the perfect environment for yeast and bacteria to grow.
Signs your pet may have an ear infection include:
Head shaking
Scratching at the ears
Redness or swelling
Odour from the ears
Dark debris or discharge
To properly diagnose an ear infection, we perform an ear cytology. This simple test lets us look at a sample from your pet’s ear under the microscope to see exactly what’s going on. We can determine whether the issue is yeast, bacteria (rods or cocci), or inflammation.
Why does this matter? Because knowing the cause allows us to choose the best and most effective treatment for your pet instead of guessing.
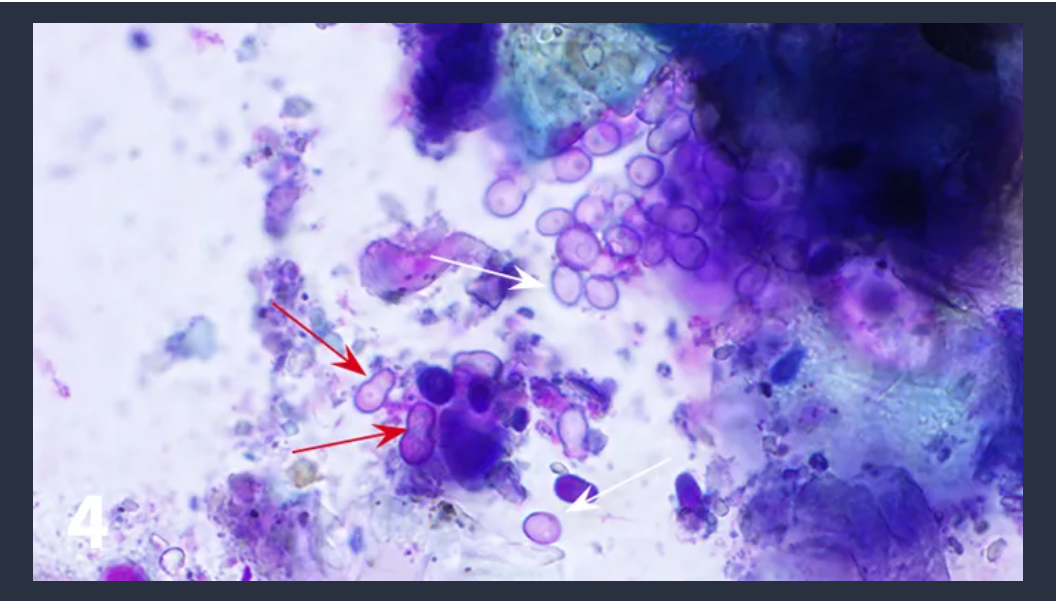
Image: Numerous organisms consistent with Malassezia spp. (yeast). Image by: Clinicians Brief
If your pet is diagnosed with an ear infection, please remember to schedule a progress assessment on the last day of treatment (typically 7–14 days) and to complete the full course of prescribed medications. Rechecks are crucial to ensure:
The infection or inflammation is fully resolved
There are no ongoing underlying issues (e.g. allergies)
Medication is working effectively and not causing side effects
Adjustments can be made to the treatment plan if needed
Long-term ear health is maintained
What Happens During an Ear Progress Exam:
History and Observation
Have symptoms improved? Any side effects?
Are you able to administer medications as prescribed?
Otoscope Examination
The veterinarian will examine the ear canal for inflammation, debris, or discharge.
We assess the health of the ear canal and tympanic membrane (ear drum) if visible.
Ear Cytology
A swab is taken from the ear and examined under a microscope to look for:
Bacteria (cocci or rods)
Yeast (usually Malassezia)
Inflammatory cells
Treatment Adjustment
Based on the findings, the treatment may be continued, adjusted, or stopped.
In some cases, further diagnostics may be recommended.
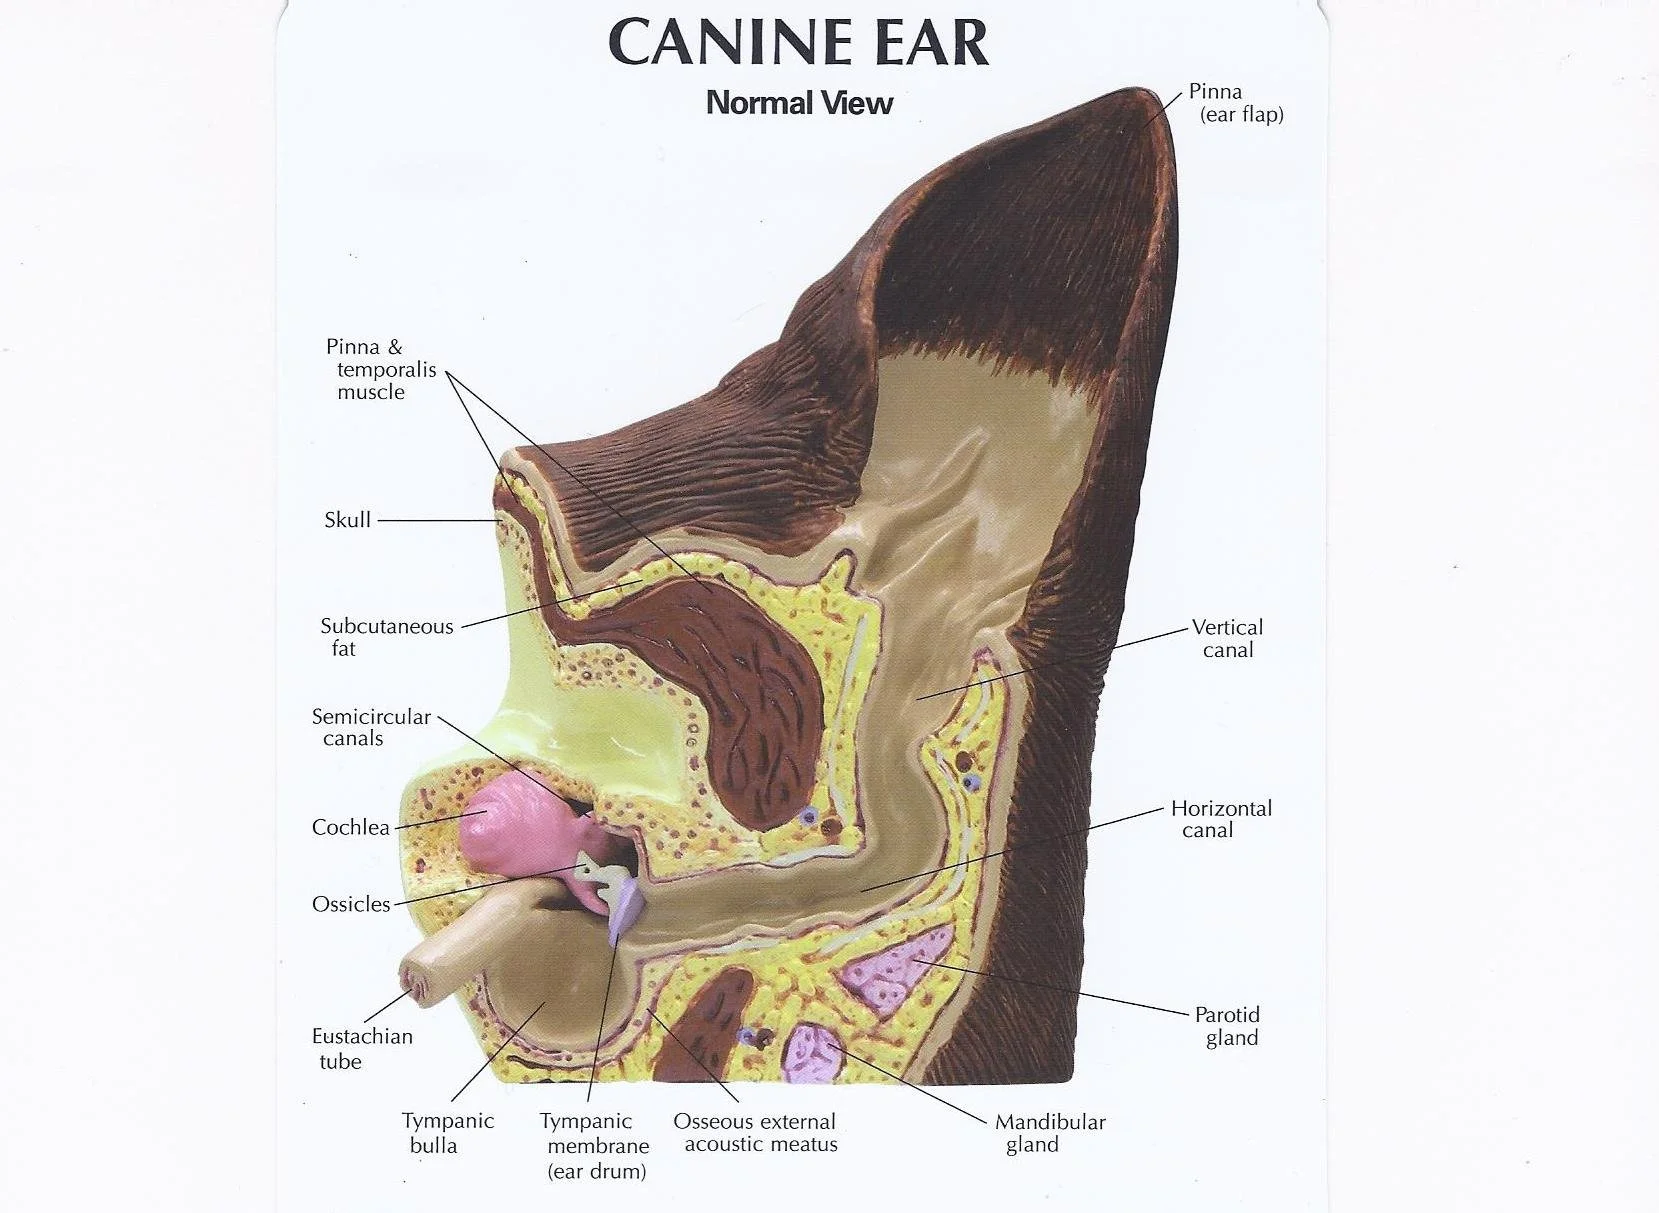
Key features of a normal ear canal: 1) Smooth, thin canal walls, 2) Wide, open ear canal, 3)Minimal wax or debris 4) No redness, swelling, or odour
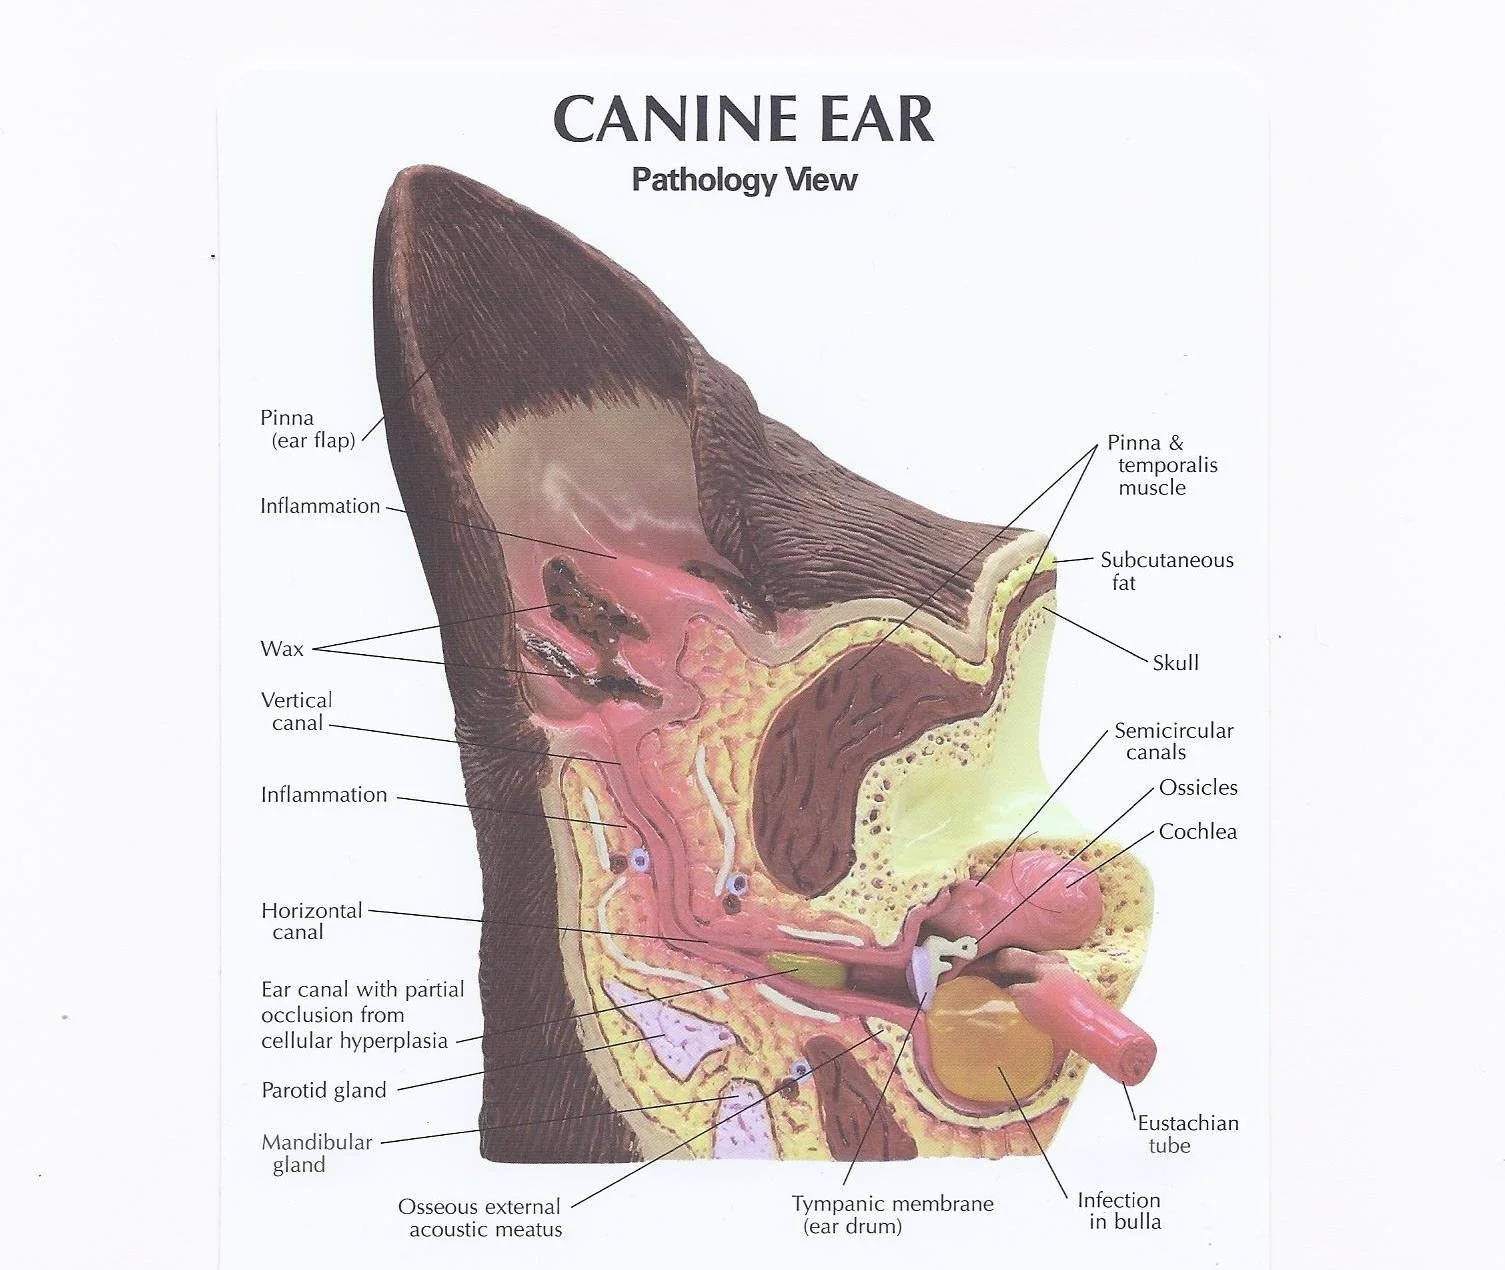
Key features of abnormal ear canal: 1) Redness of the ear canal lining 2) thickened ear canal walls 3) debris or discharge 4) narrowed ear canal due to swelling or chronic changes
Typical Recheck Schedule:
Initial recheck: 7–14 days after starting treatment
Additional rechecks: Every 1–2 weeks until resolved
Chronic/recurrent cases: May require regular maintenance rechecks (e.g. every 1–3 months)
Cost of an Ear Progress Assessment:
We understand that ear infections can become expensive to treat. When you come in for an ear recheck, we offer a discounted combined price for the assessment.
When to Call Before the Scheduled Recheck:
Worsening symptoms (e.g. shaking, pain, discharge)
New signs of discomfort or swelling
Trouble administering medications
Hearing loss or head tilt
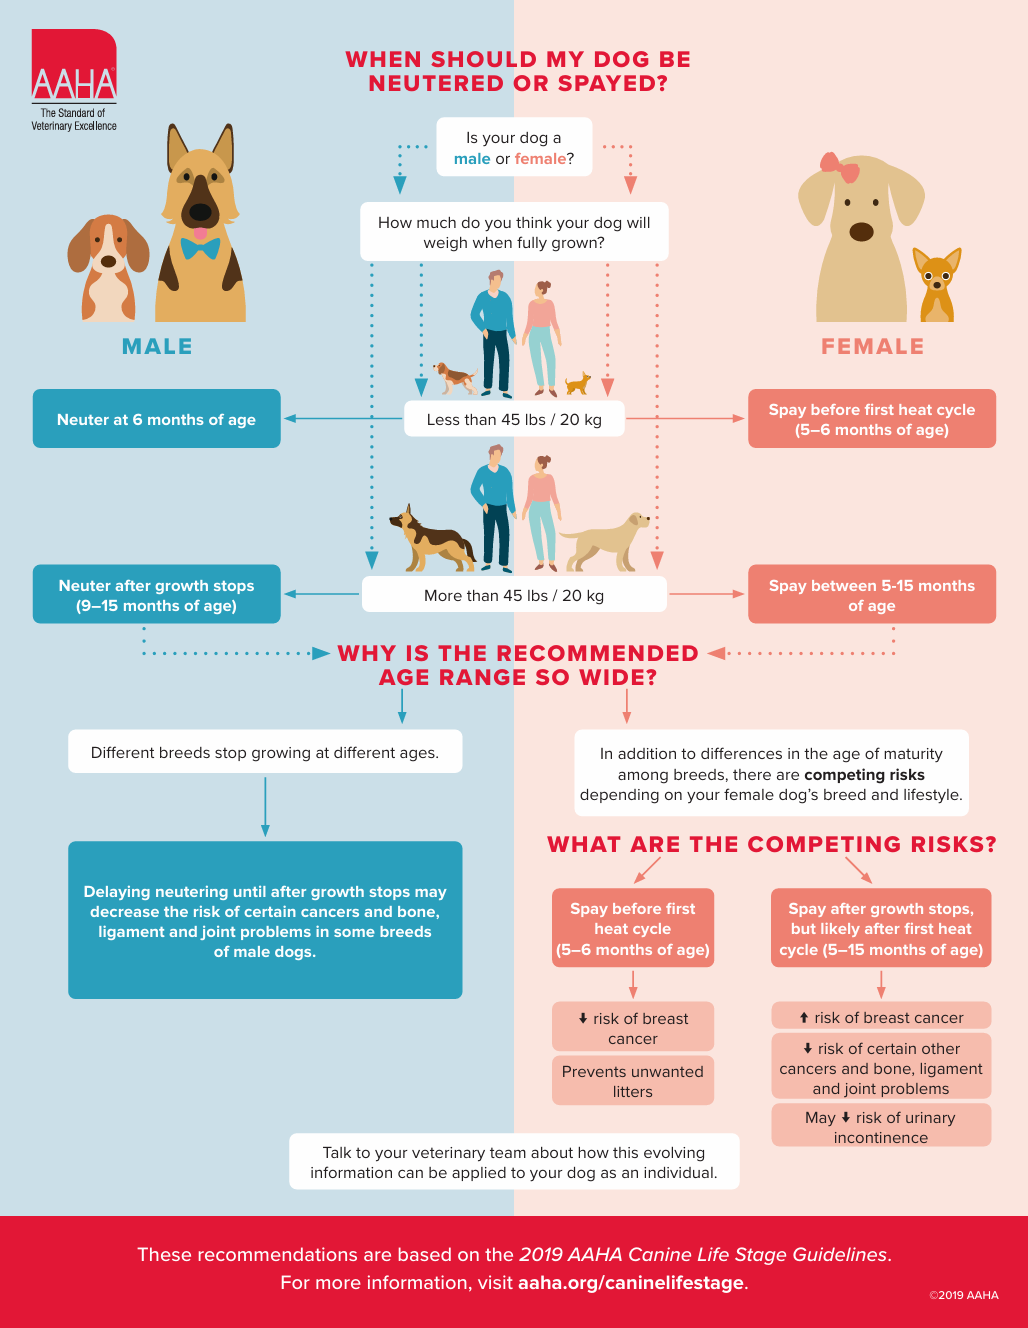
Spaying and Neutering Your Dog or Cat
Spaying and neutering are important procedures for your pet’s long-term health, behavior, and population control. Knowing the right time for surgery can make the process safer and more effective.
Dogs
We recommend spaying or neutering once your dog is fully developed, which can vary depending on breed and weight. Larger breeds may need to wait longer for full skeletal and hormonal maturity, while smaller breeds often reach development sooner.
Note: There will be additional charges for:
Mature dog spays (over 1 year old): The uterus is more developed, which requires longer surgical time.
Obese dog spays: Extra surgical time is often required because tissues are more friable and blood vessels are harder to see, making the procedure more complex.
Cats
For cats, we recommend spaying or neutering before 5 months of age.
The American Association of Feline Practitioners (AAFP) supports the “Feline Fix by Five” initiative.
This initiative is designed to prevent unintended pregnancies, as cats can reach sexual maturity and become pregnant as early as 4–5 months of age.
Spaying Options
For female pets, we may perform either:
Ovarioectomy: Removal of the ovaries only
Ovariohysterectomy: Removal of both the ovaries and uterus
The choice of procedure is typically based on the preference of the surgeon and inspection of the uterus at the time of surgery. If you have a preferred procedure, please let us know when booking.
Important: We do not advise spaying dogs in heat, as there is increased blood supply to the uterus, making the tissues more fragile and increasing the risk of bleeding. We recommend waiting at least 6–8 weeks after the end of the heat cycle before performing a spay.
Additional Procedures and Considerations
During spay or neuter procedures, we often recommend additional procedures to ensure your pet’s health:
Pre-anesthetic blood work: Helps ensure your pet is healthy and safe for anesthesia.
Removal of persistent deciduous teeth: Some pets retain baby teeth that should be removed.
Hernia repair: If present, hernias can be repaired at the same time.
Special Considerations for Males
If a male is a cryptorchid (only one testicle has descended), additional procedures are required:
The retained testicle may be inguinal (in the groin) or intra-abdominal.
Surgical removal differs depending on the location of the testicle, and additional charges will apply.
Pre-Surgery Exams
A pre-spay and neuter exam allows our veterinary team to:
Ensure your pet is fit for surgery (e.g., no heart murmurs or other concerns).
Provide an accurate estimate of costs prior to the procedure.
Plan for any additional procedures, like those listed above.
Bottom Line: Proper timing, choice of procedure, and pre-surgical planning ensure your pet has a safe, successful spay or neuter surgery and sets them up for long-term health.
Dental Month- Equine Edition!
Dental Care for Performance & Comfort
Dental care isn’t just for dogs and cats—horses need healthy teeth too! Proper dental health is essential for your horse’s comfort, nutrition, and overall wellbeing.
Why Horse Teeth Matter
Horses have teeth that continuously grow throughout their lives. Without regular care, uneven wear can lead to:
Sharp points or hooks that can cut the cheeks or tongue
Difficulty chewing and poor digestion
Weight loss or selective eating
Painful oral conditions that may go unnoticed
Even subtle changes in eating habits, head tossing, or resistance to the bit can signal dental discomfort.
What We Look for During an Equine Dental Exam
During a routine dental exam, your veterinarian will check for:
Sharp enamel points or hooks – can cause cuts and pain
Malocclusions – uneven tooth wear that affects chewing
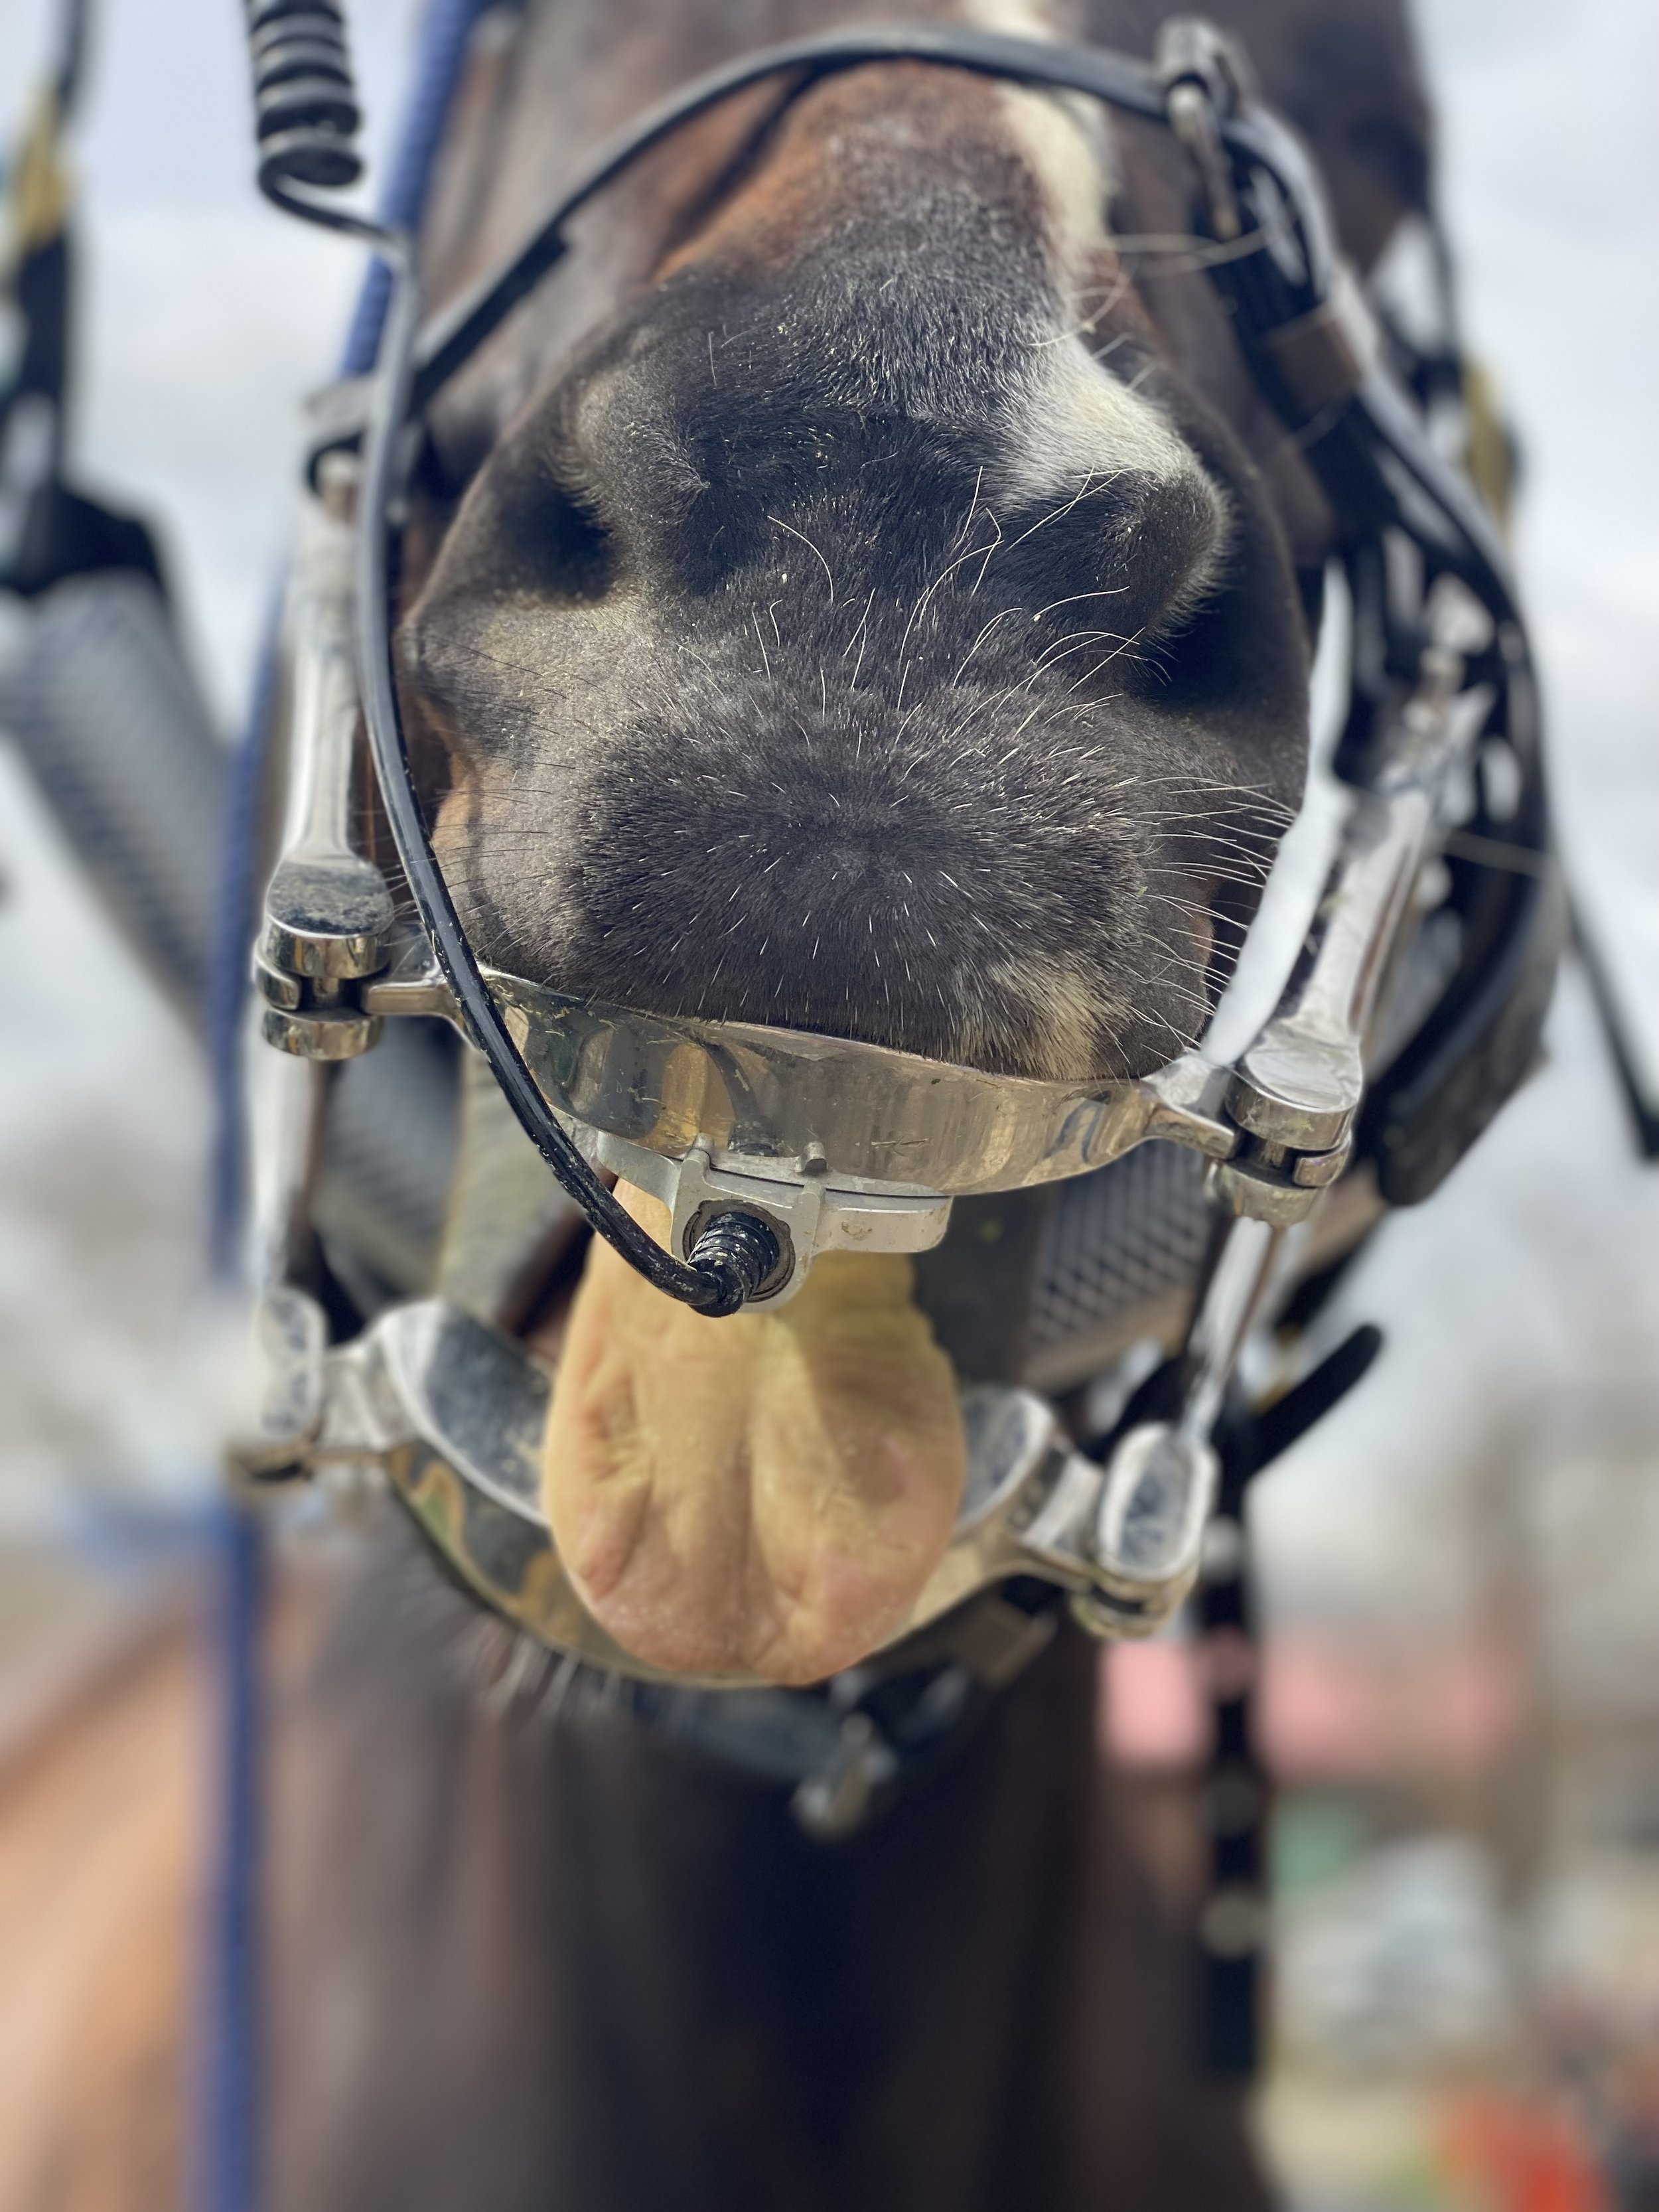
A rostral hook can be seen in this photo.
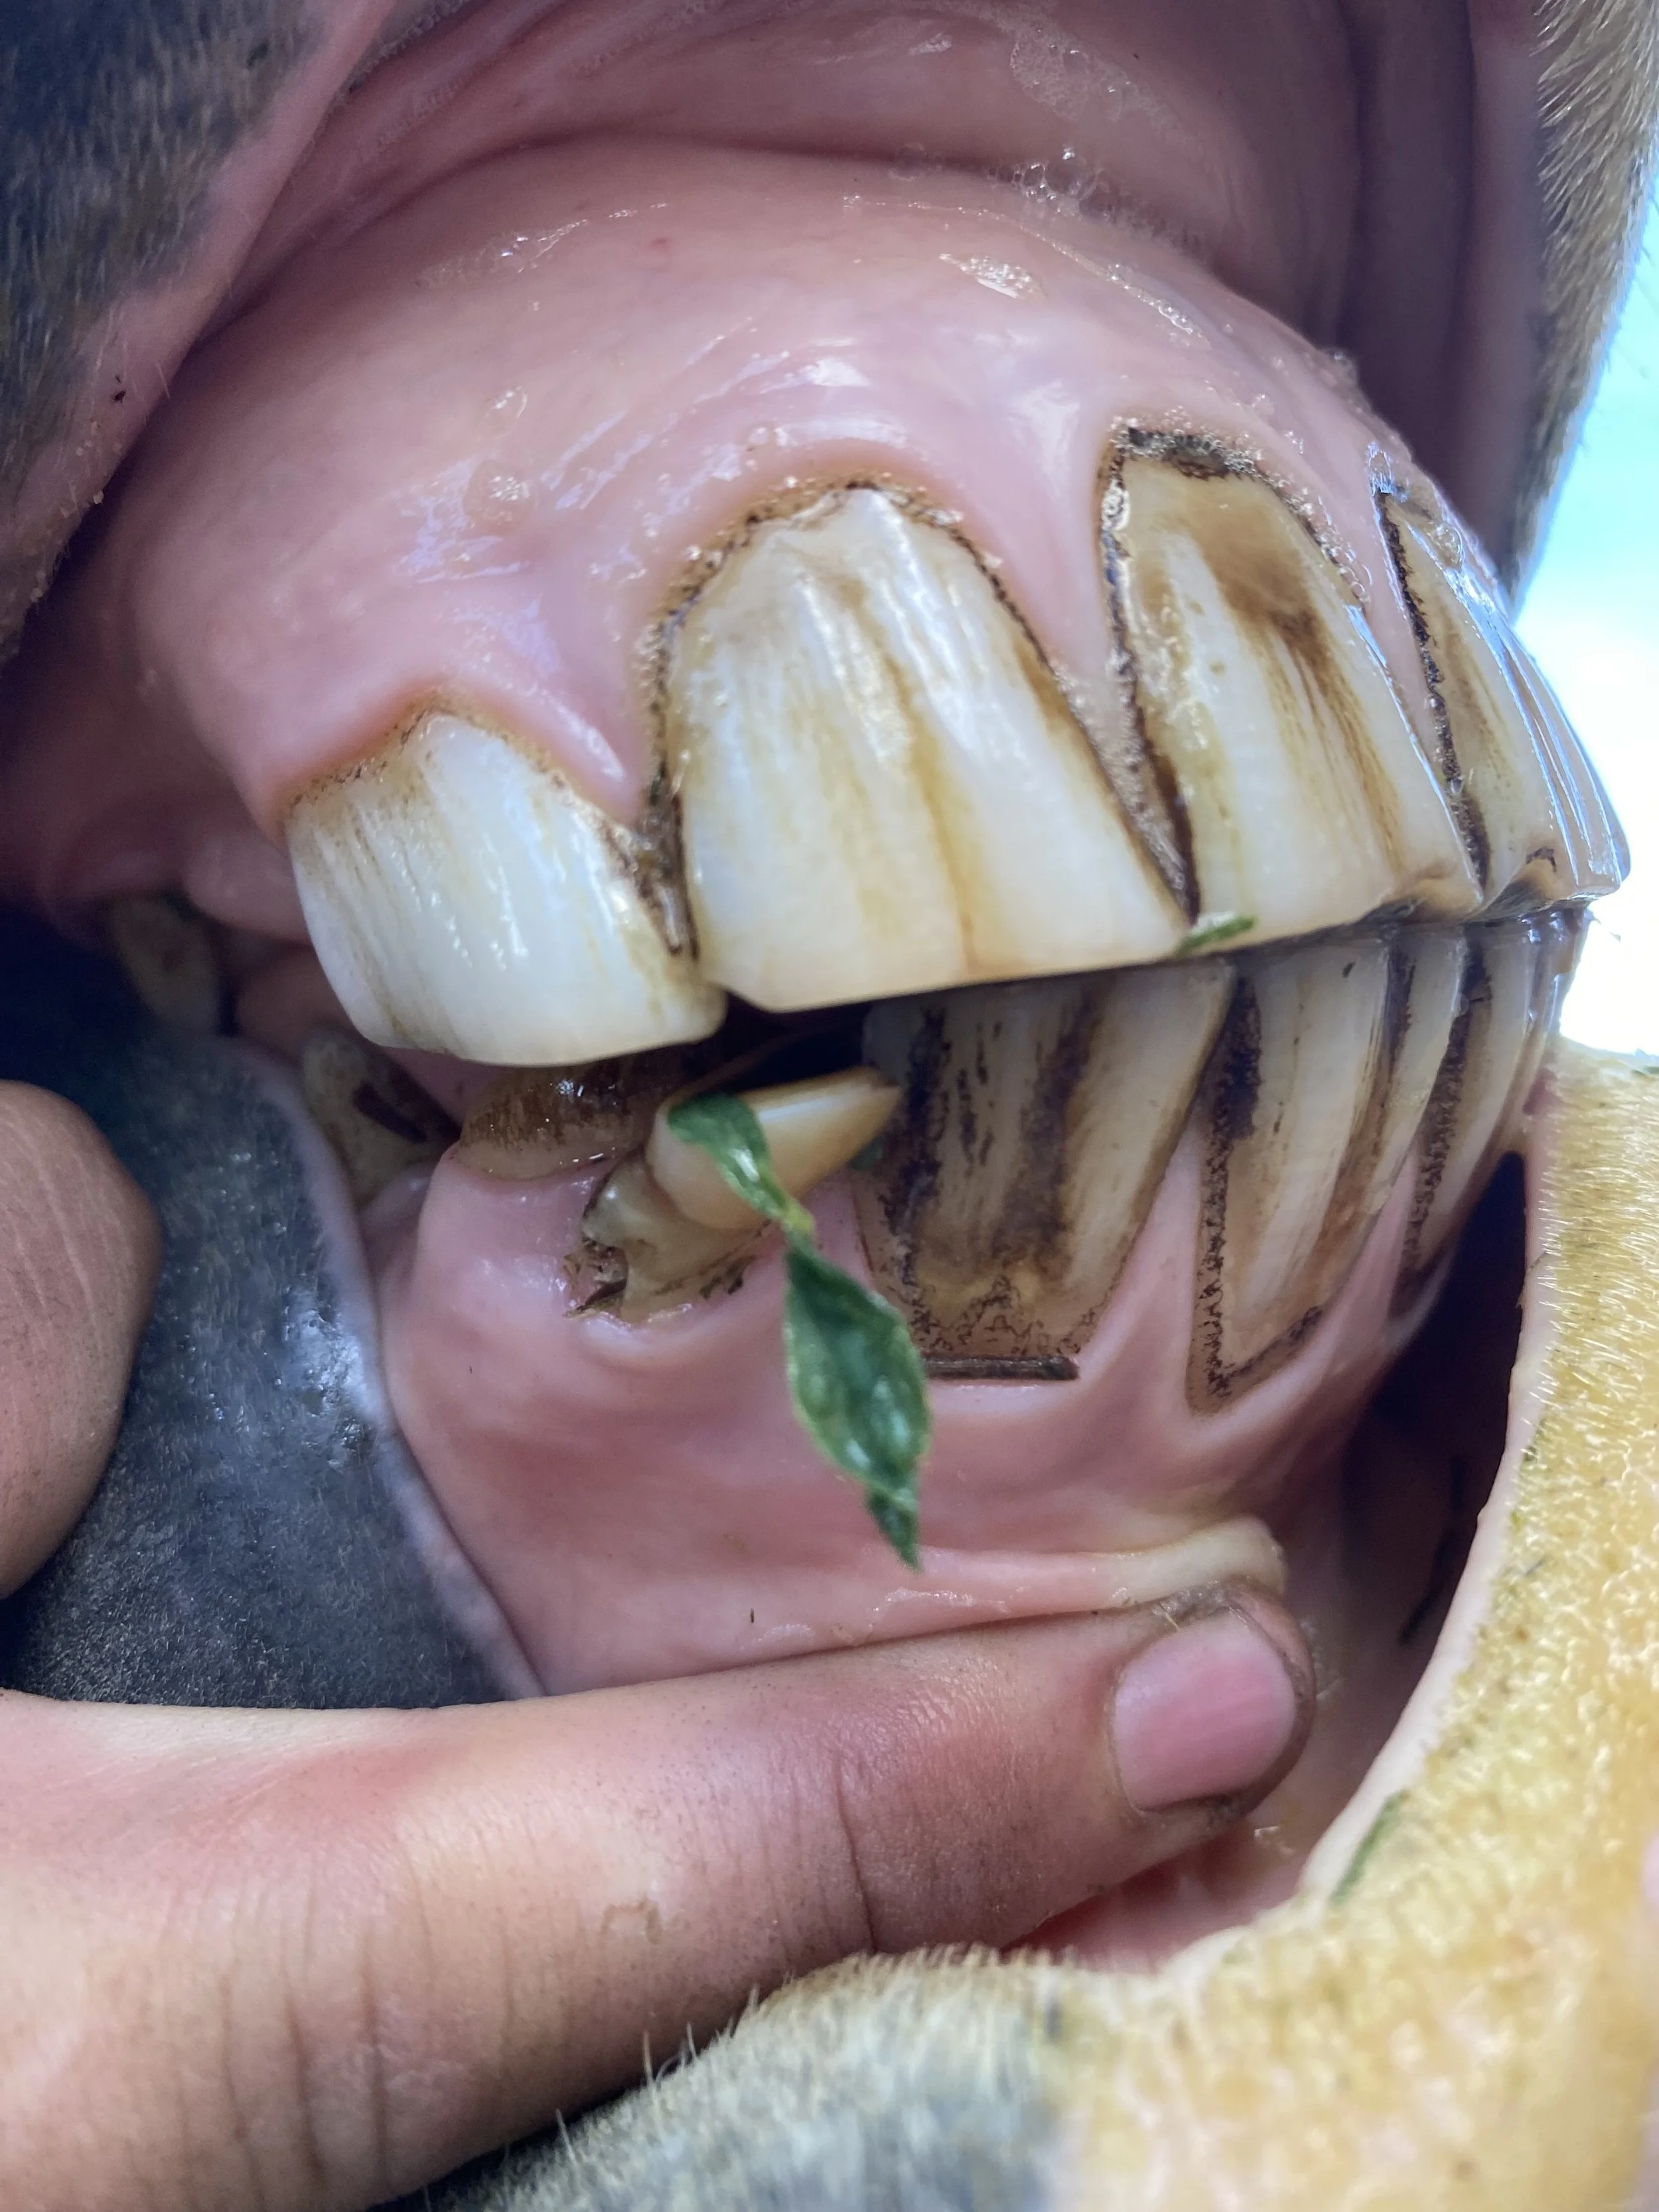
Wolf teeth – small premolars that can interfere with the bit
Retained caps – leftover baby teeth that can cause crowding.
Signs of infection or decay – including abscesses or fractures
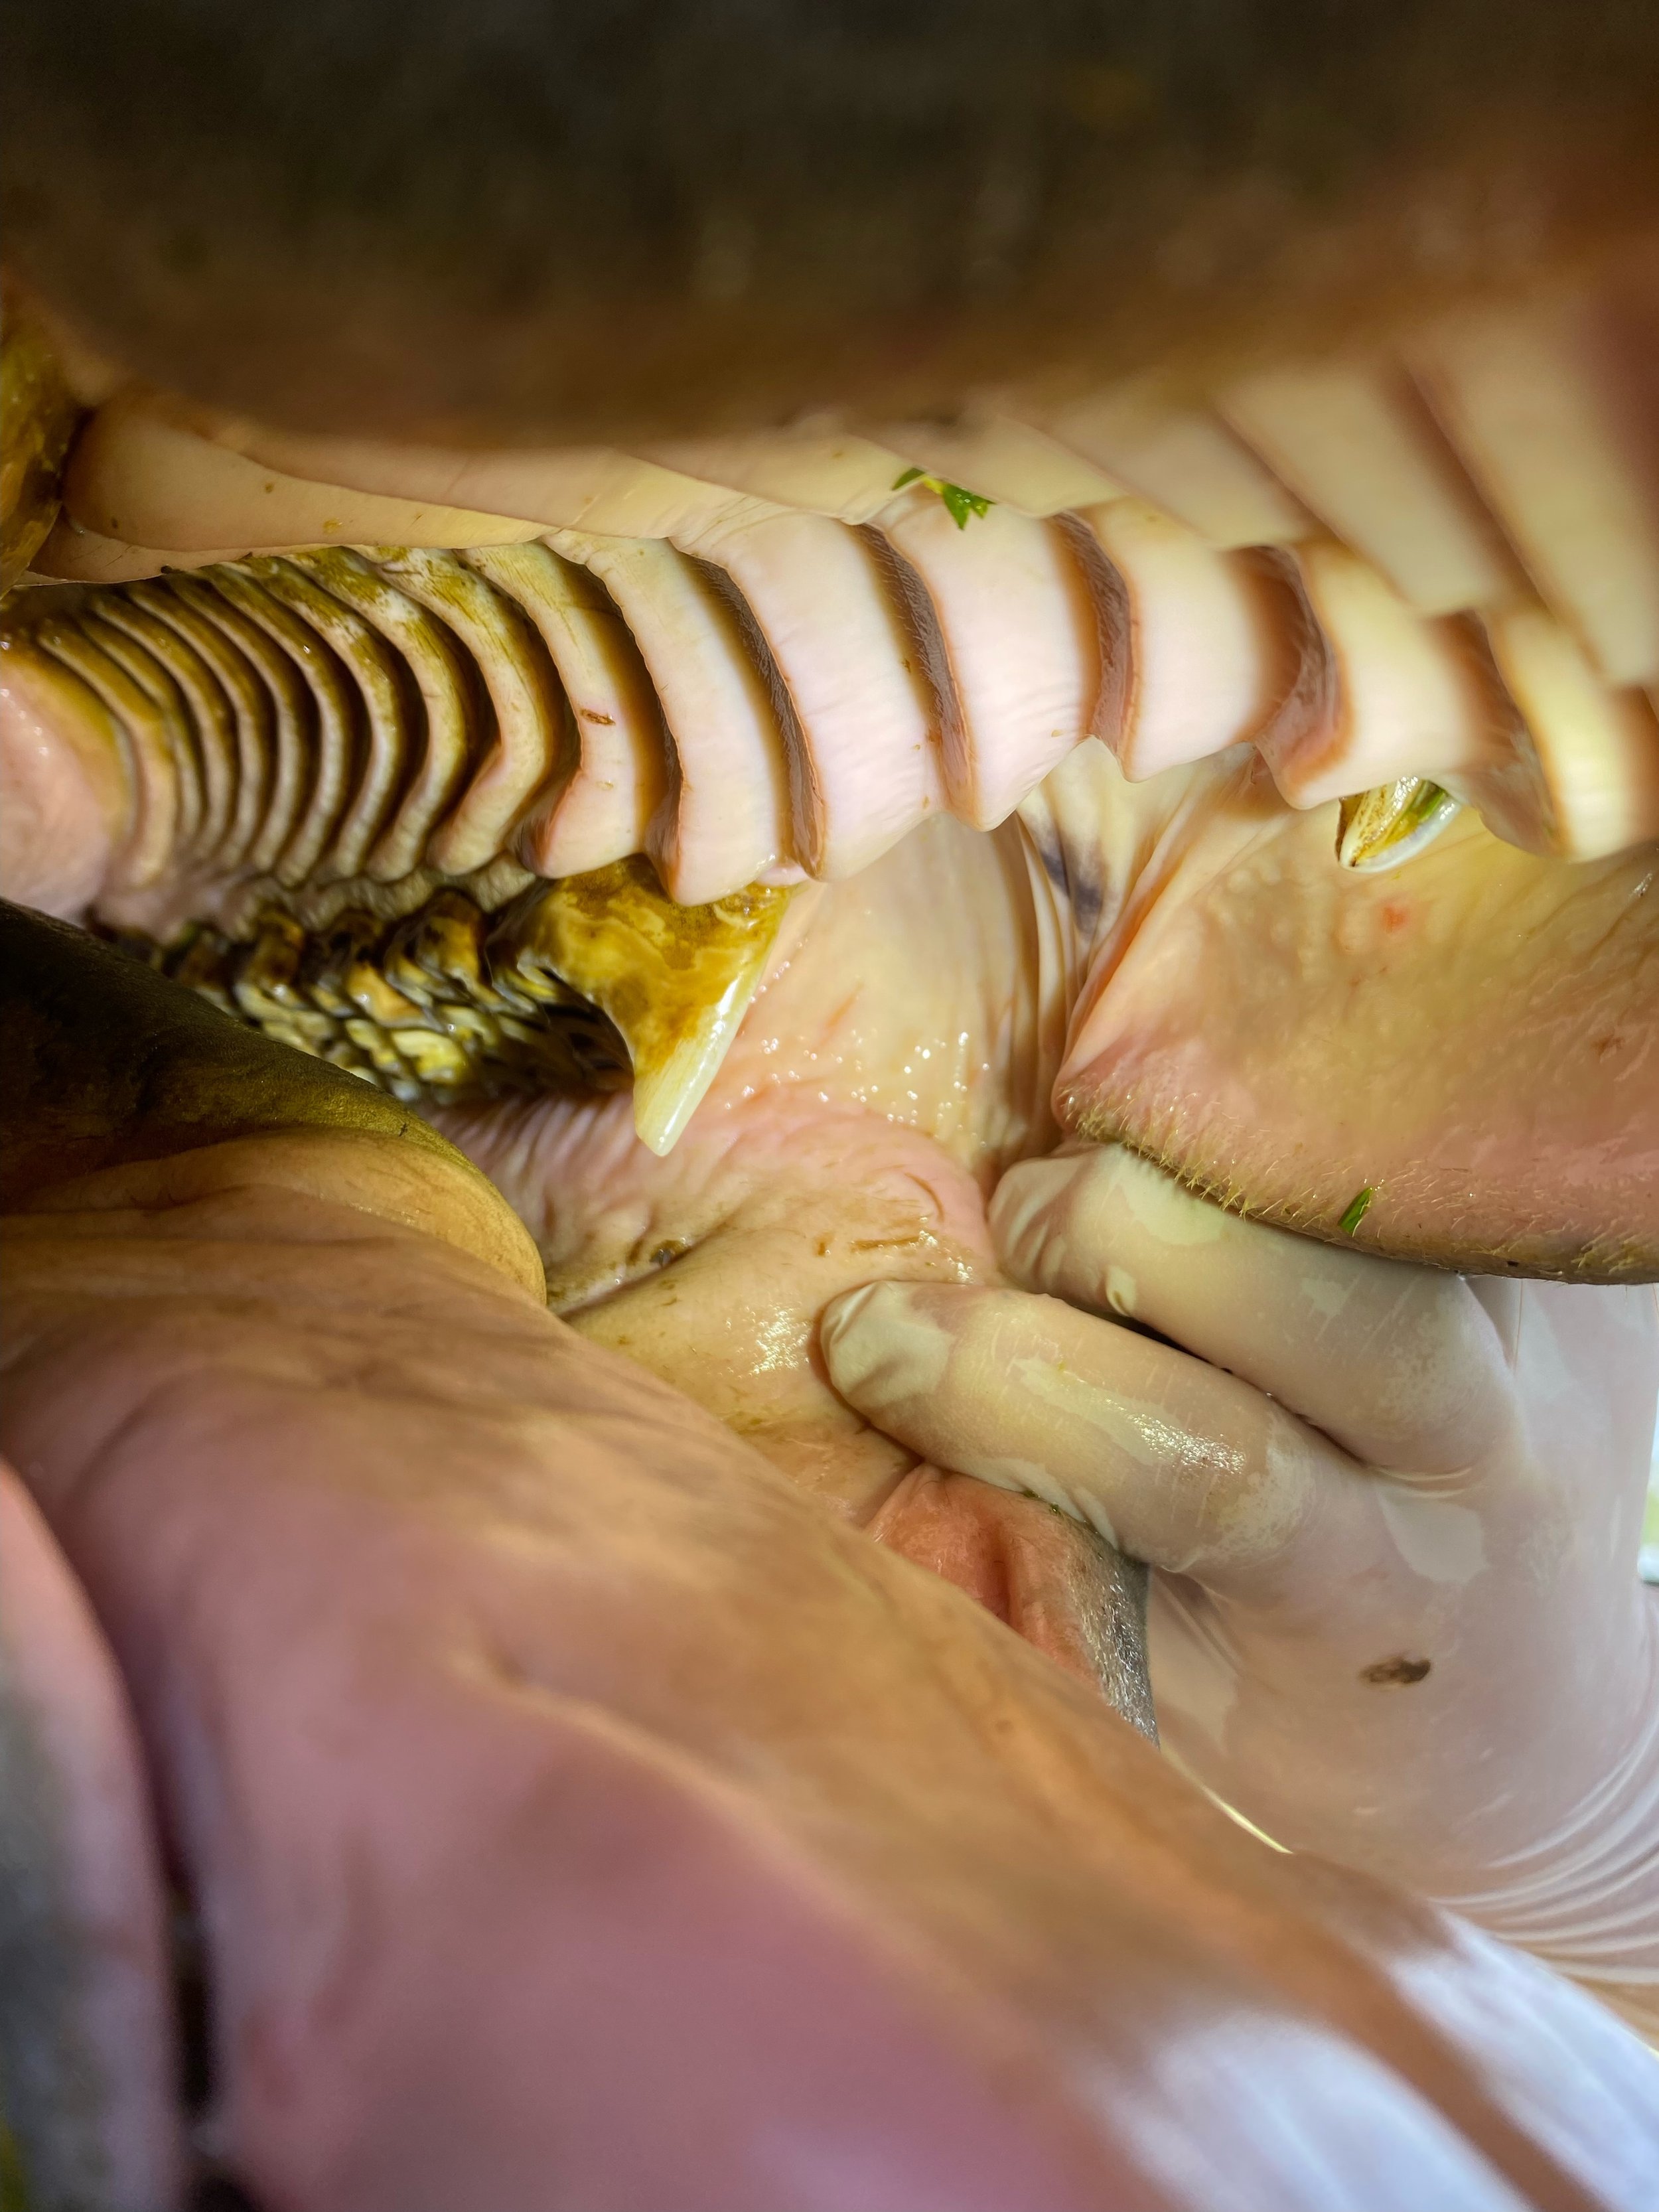
A retained incisor can be seen in this photo.
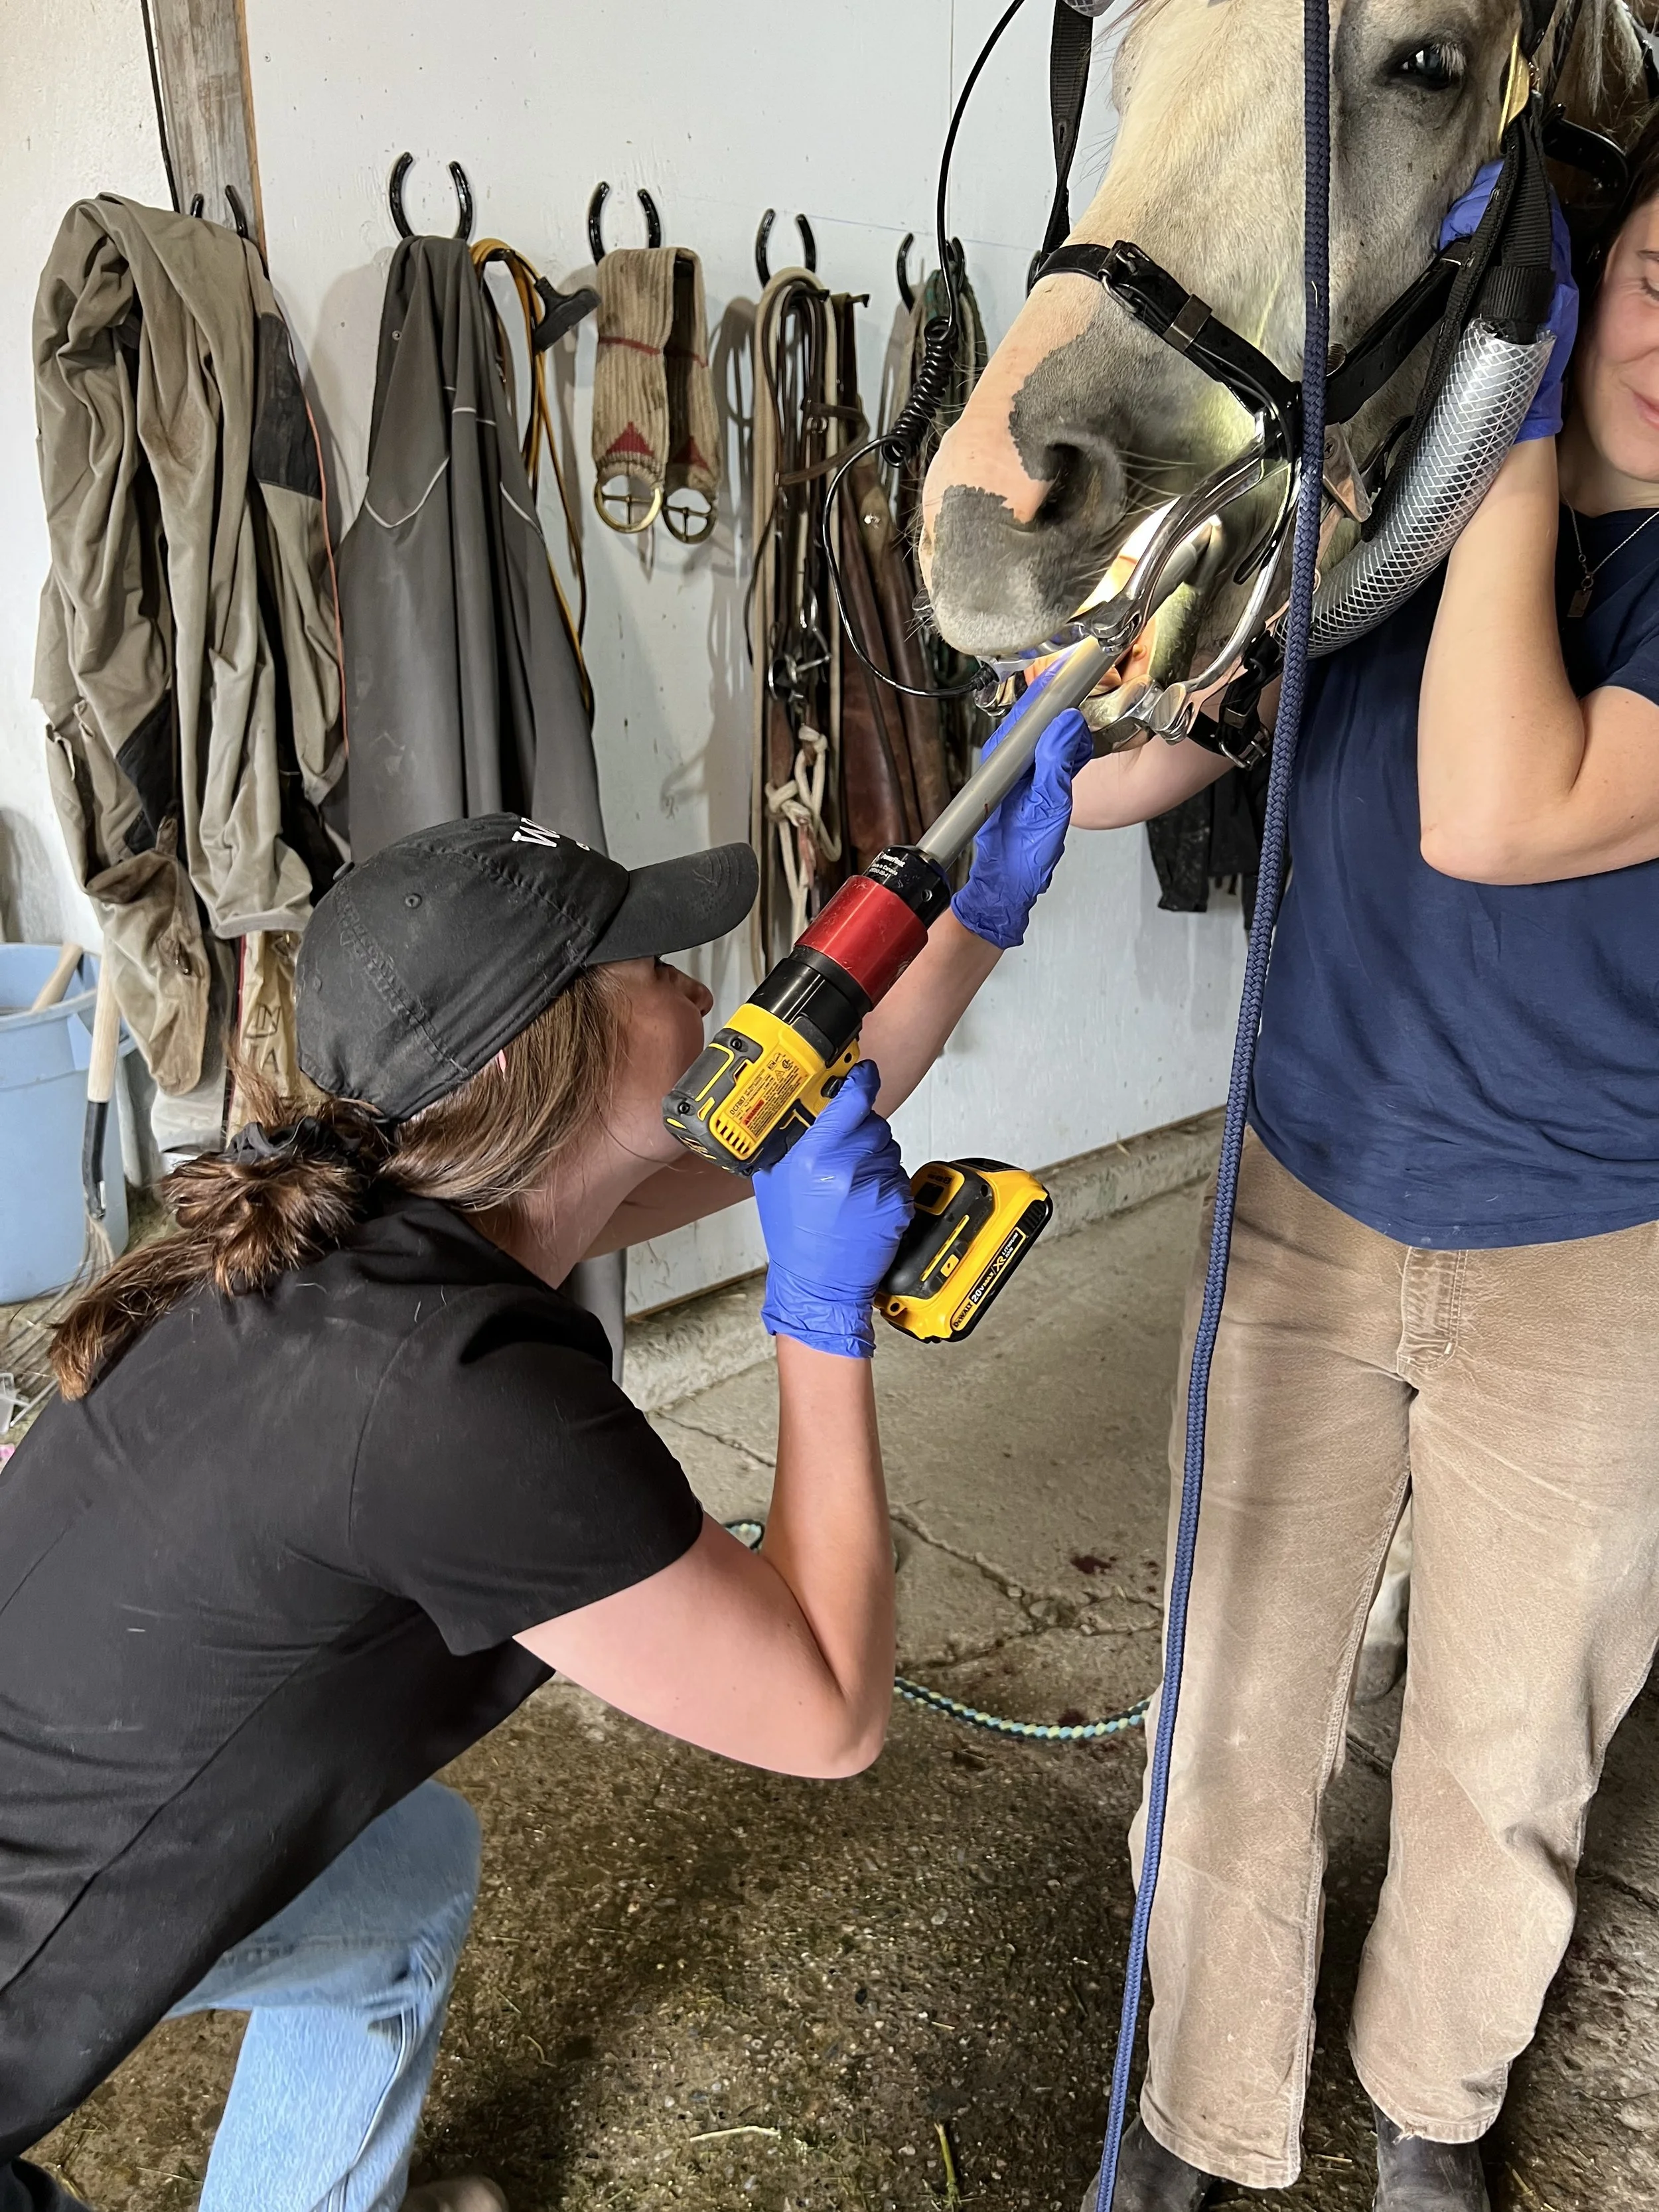
Using sedation & specialized tools, veterinarians can safely file teeth (called floating) to correct uneven surfaces and prevent further issues.
How Often Should You Check Your Horse’s Teeth?
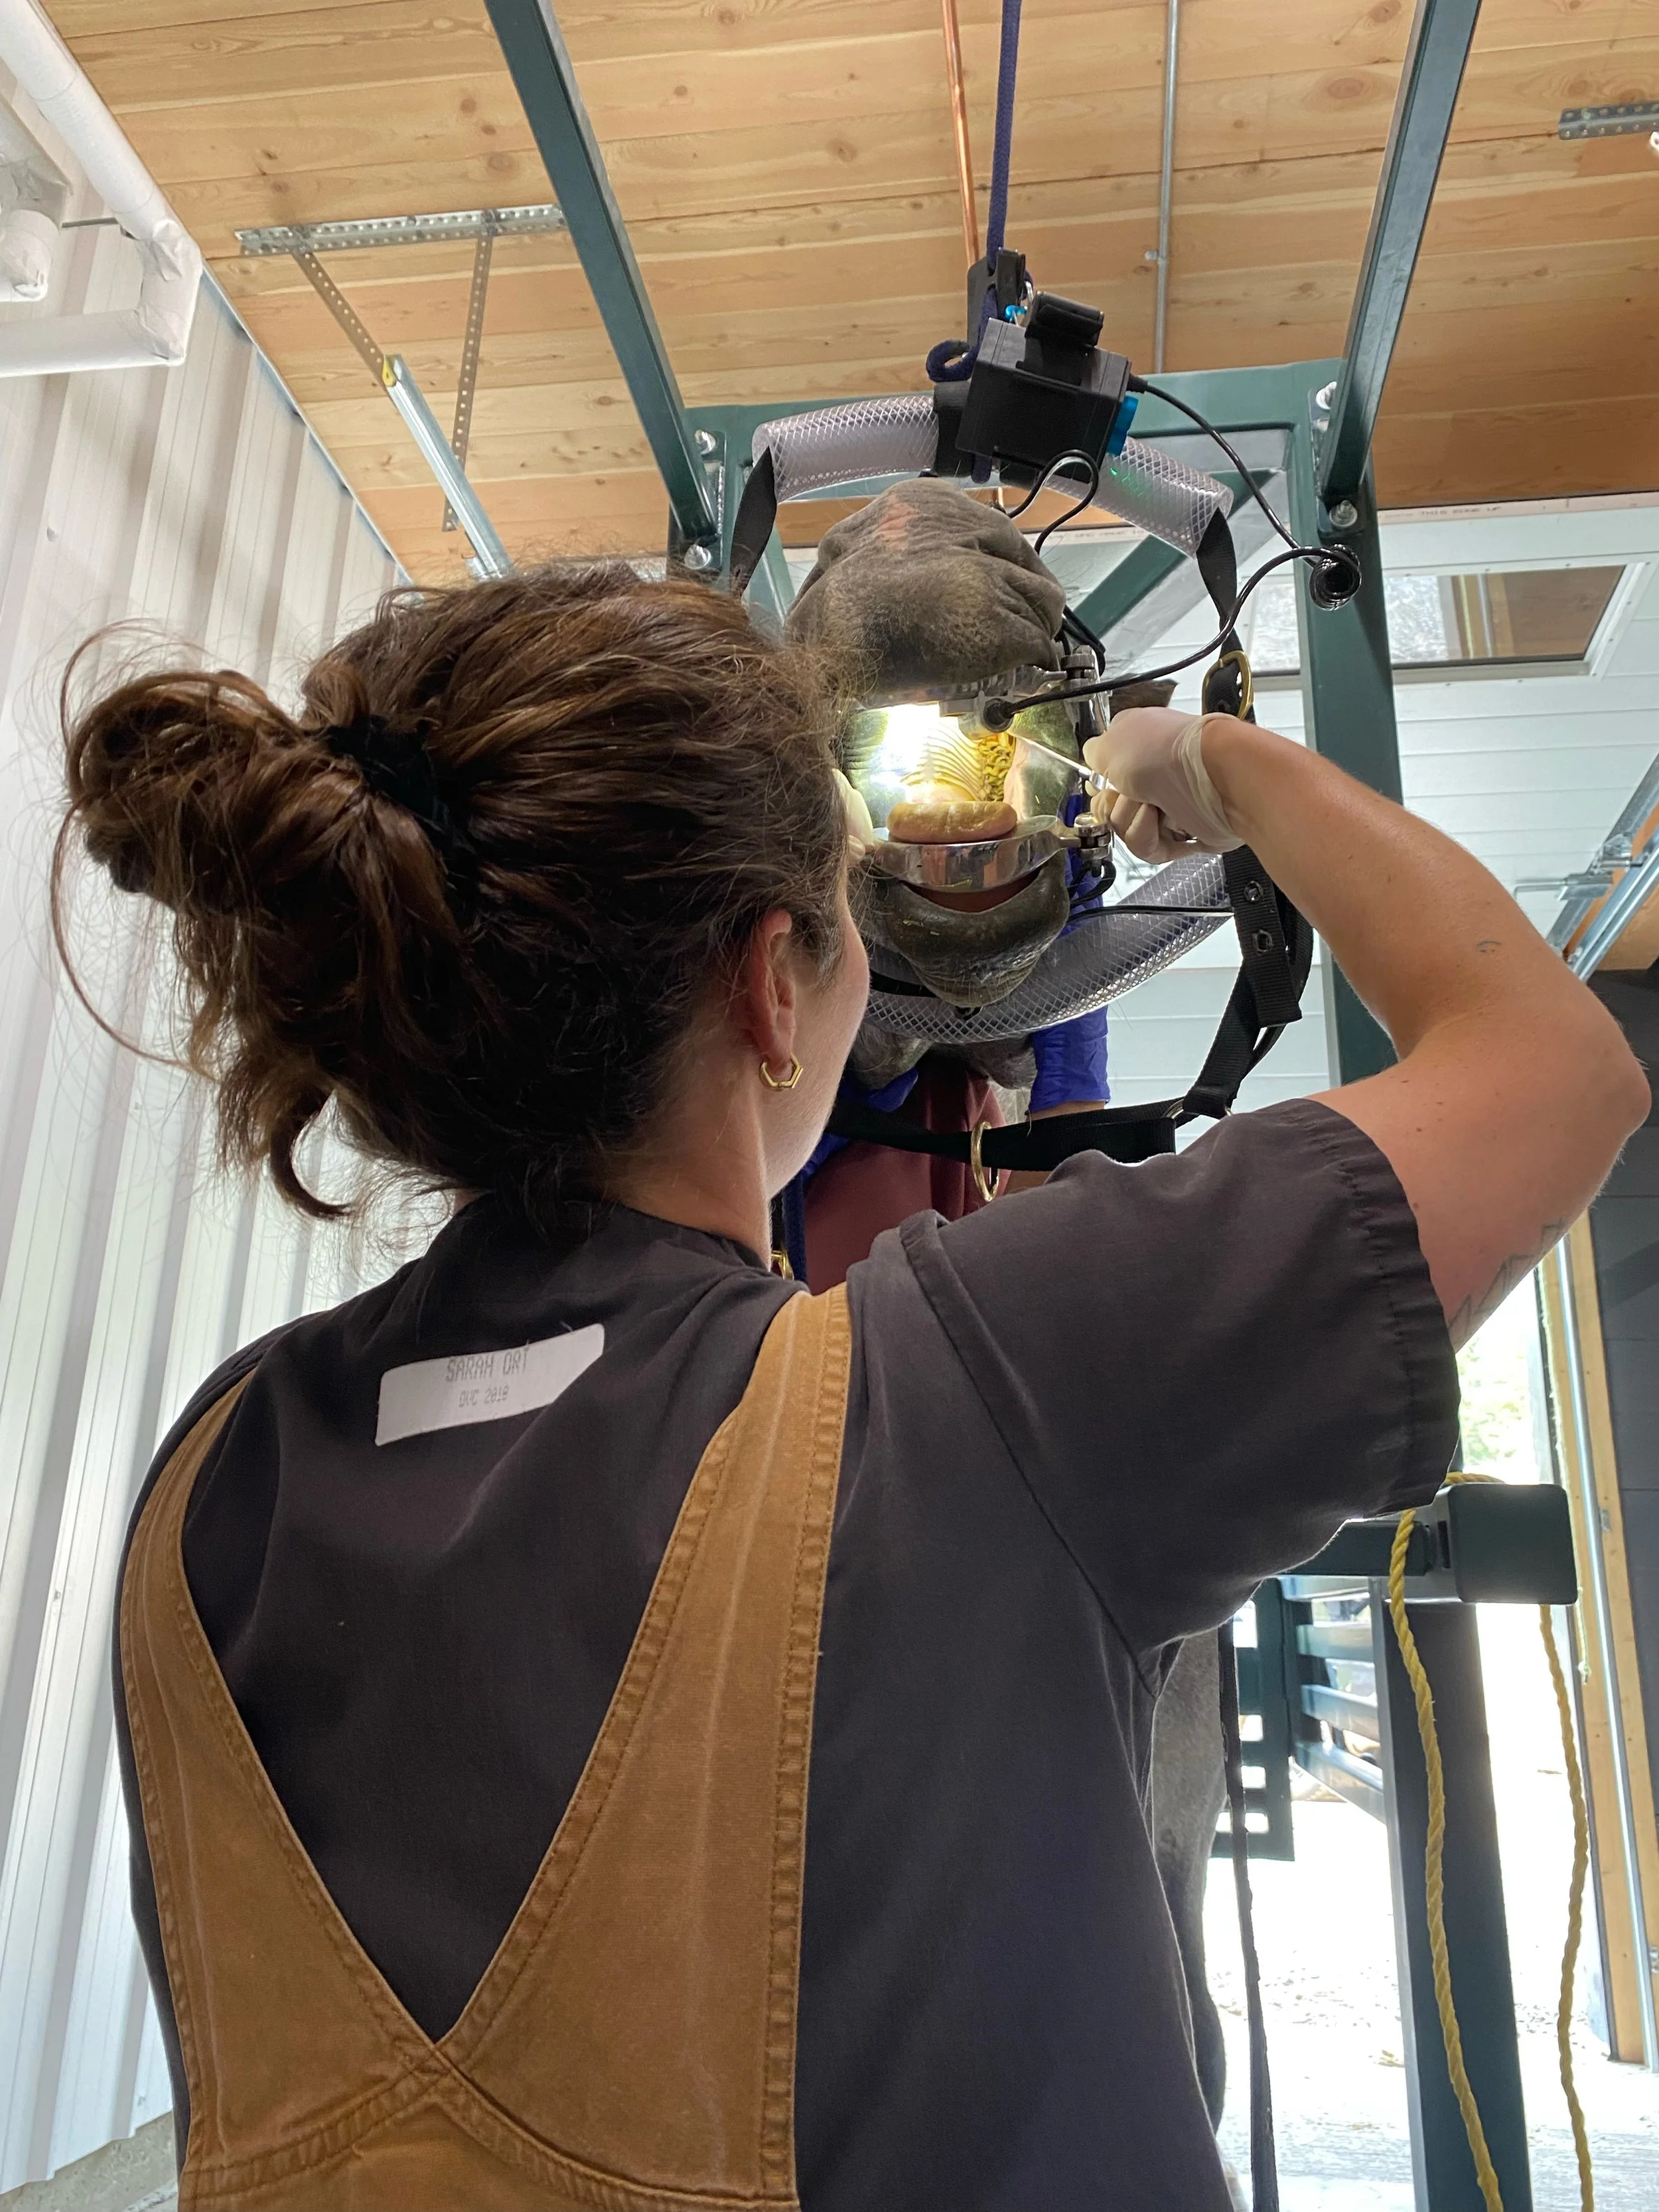
Most horses benefit from a sedated dental exam at least once a year, though young horses, older horses, or those showing signs of discomfort may need checks every 6–12 months.
At-Home Tips for Supporting Dental Health
While professional exams are essential, you can support your horse’s dental care at home by:
Monitoring eating habits and behavior
Checking for weight loss or dropping feed
Inspecting the mouth occasionally if your horse allows
Encouraging natural grazing through appropriate forage choices
Healthy Teeth = Happy Horse
Regular dental care keeps your horse comfortable and performing at their best. Don’t wait for signs of pain—early detection and prevention make all the difference.
📞 Contact us today to schedule your horse’s dental checkup!
February is Dental Month- small animal edition
Did you know that dental disease is one of the most common health issues in pets—and one of the most overlooked? Dental Month is the perfect time to shine a light on your pet’s oral health and how much it impacts their overall wellbeing.
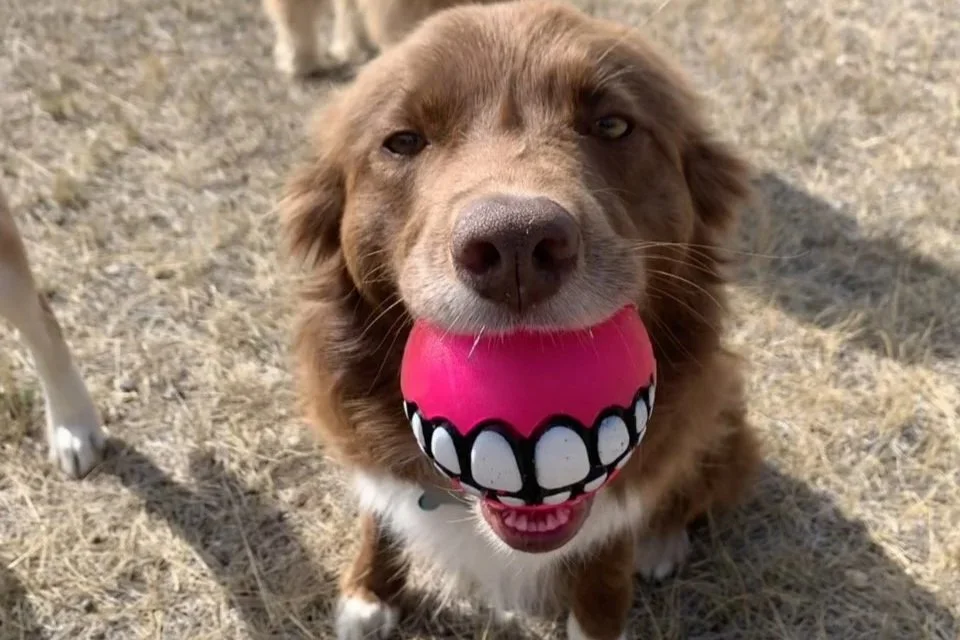
In the photo, Polly is featuring a dental-safe dog ball—avoid regular tennis balls, which can wear down teeth over time.
Why Dental Health Matters
By the age of three, most dogs and cats show signs of dental disease. Plaque and tartar buildup don’t just cause bad breath—they can lead to:
Painful gum inflammation
Loose or fractured teeth
Tooth root infections
Bacteria entering the bloodstream and affecting the heart, liver, and kidneys
The tricky part? Pets are experts at hiding pain. Many continue eating and acting “normal” even when their mouth is uncomfortable.
How Would You Score Your Pets Dental Health?
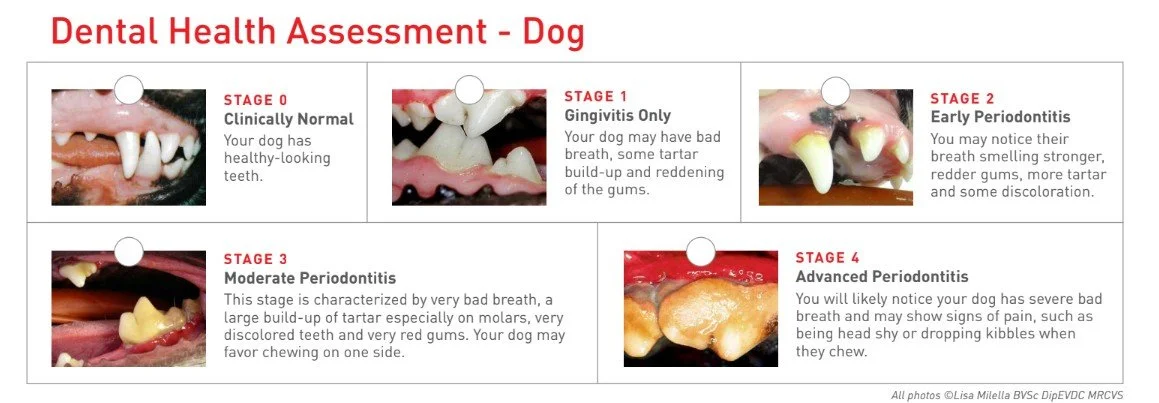
If your pet will allow it, gently lift their lip and take a peek at their teeth and gums. Use the guides to get a general idea of their dental health.
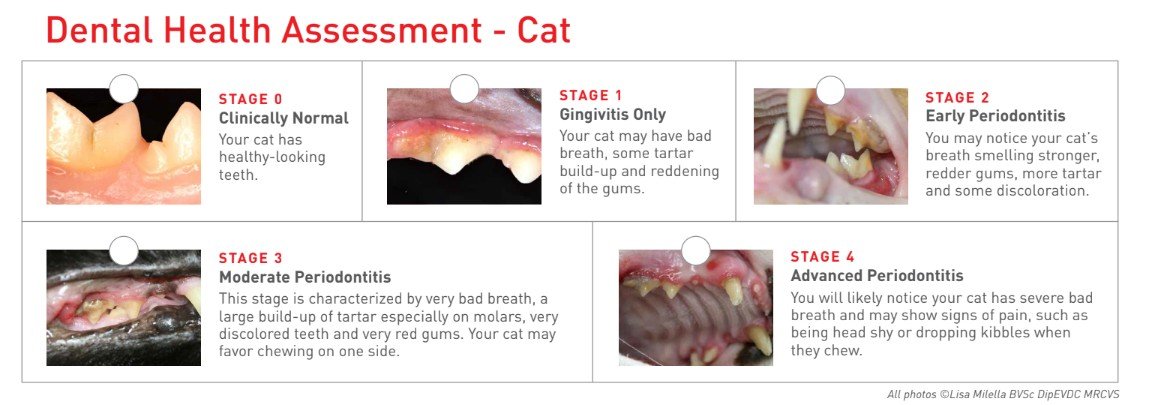
Did you know that resorptive lesions are a common dental problem in cats? Be sure to ask your veterinarian about this condition.
Dental Health Matters for Puppies & Kittens
Dental care starts early! Puppies and kittens go through important dental changes as they grow, and early oral exams help set them up for a lifetime of healthy smiles.
During a dental health check, our veterinary team looks for common issues such as retained baby teeth, which can crowd adult teeth and trap food and bacteria. We also assess for missing teeth, base-narrow canines (teeth that angle inward and may damage the palate), and fractured baby teeth, which can be painful and may lead to infection if left untreated.
Catching these problems early allows us to intervene before they cause discomfort, abnormal bite alignment, or long-term dental disease.
What We Look For During an Oral Exam
During your pet’s dental exam, our veterinary team checks:
Teeth for plaque, tartar, fractures, and discoloration
Gums for redness, swelling, bleeding, or recession
The entire mouth for ulcers, growths, or signs of infection
Breath that may indicate underlying disease or infection
Catching dental issues early can prevent pain, tooth loss, and more serious health concerns down the road.
What Is a Professional Dental Procedure?
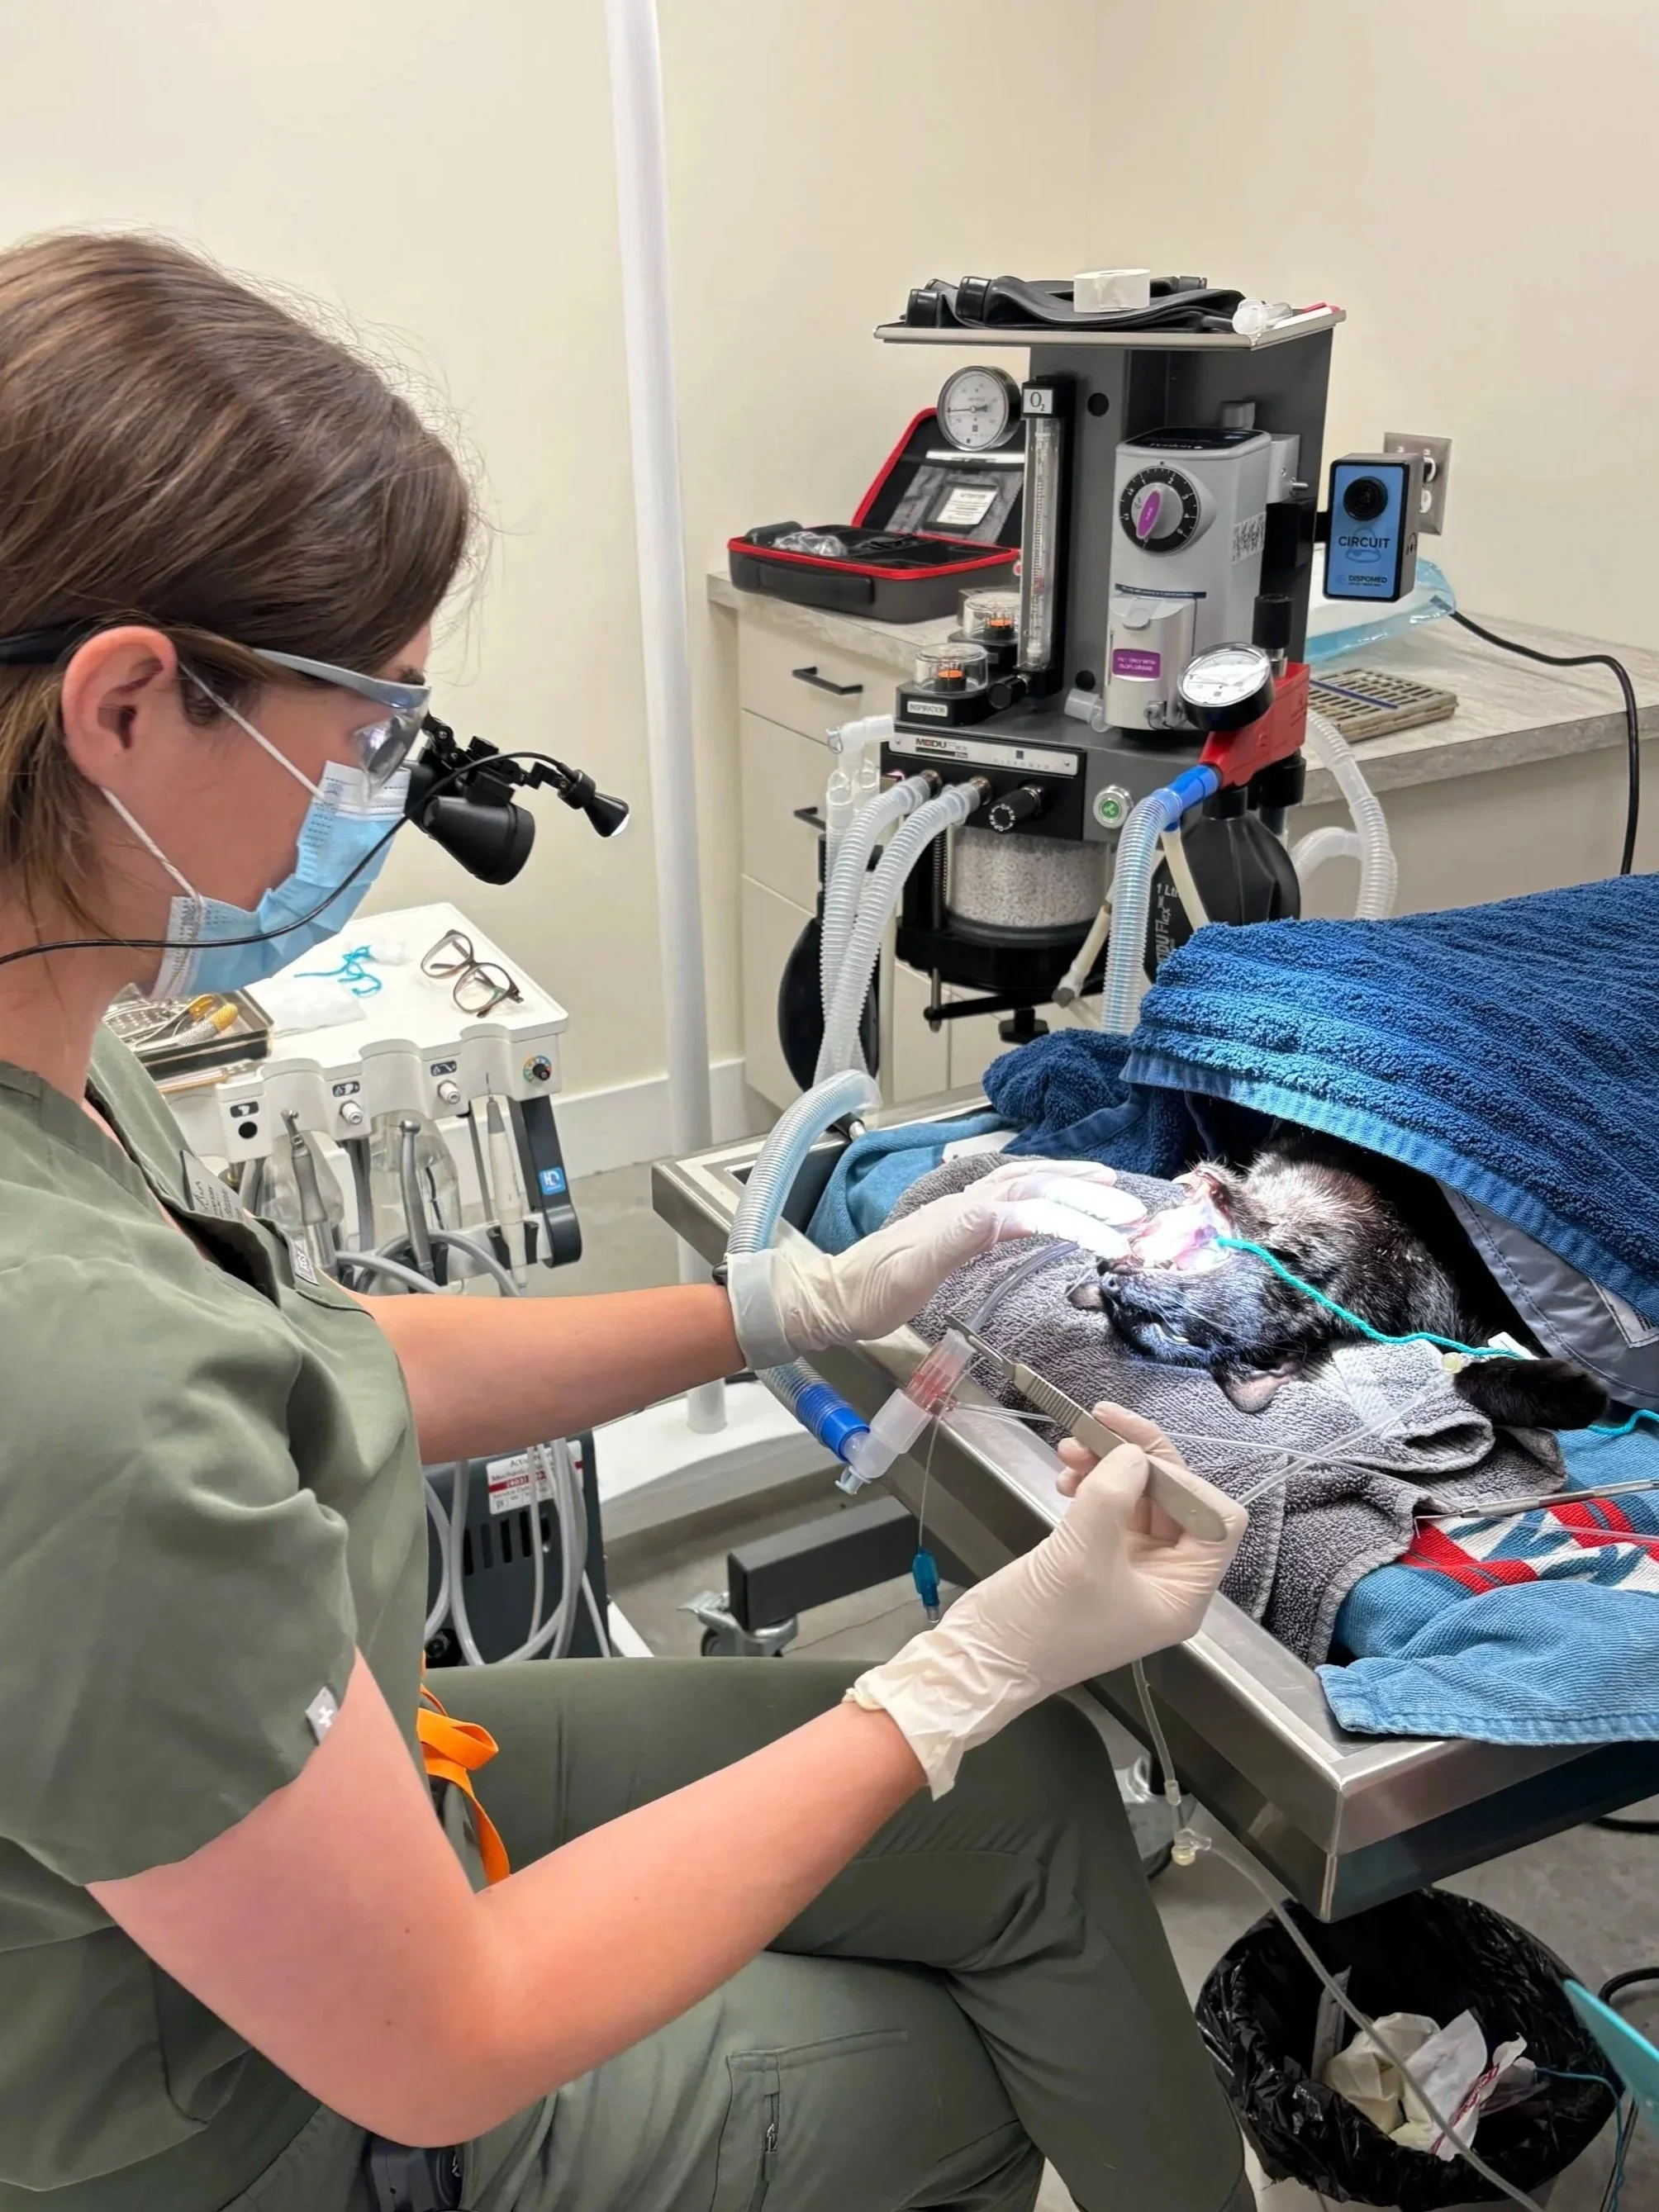
A professional dental procedure is performed under anesthesia to allow:
Thorough cleaning above and below the gumline
Treatment of painful or infected teeth
A complete, stress-free exam of the mouth
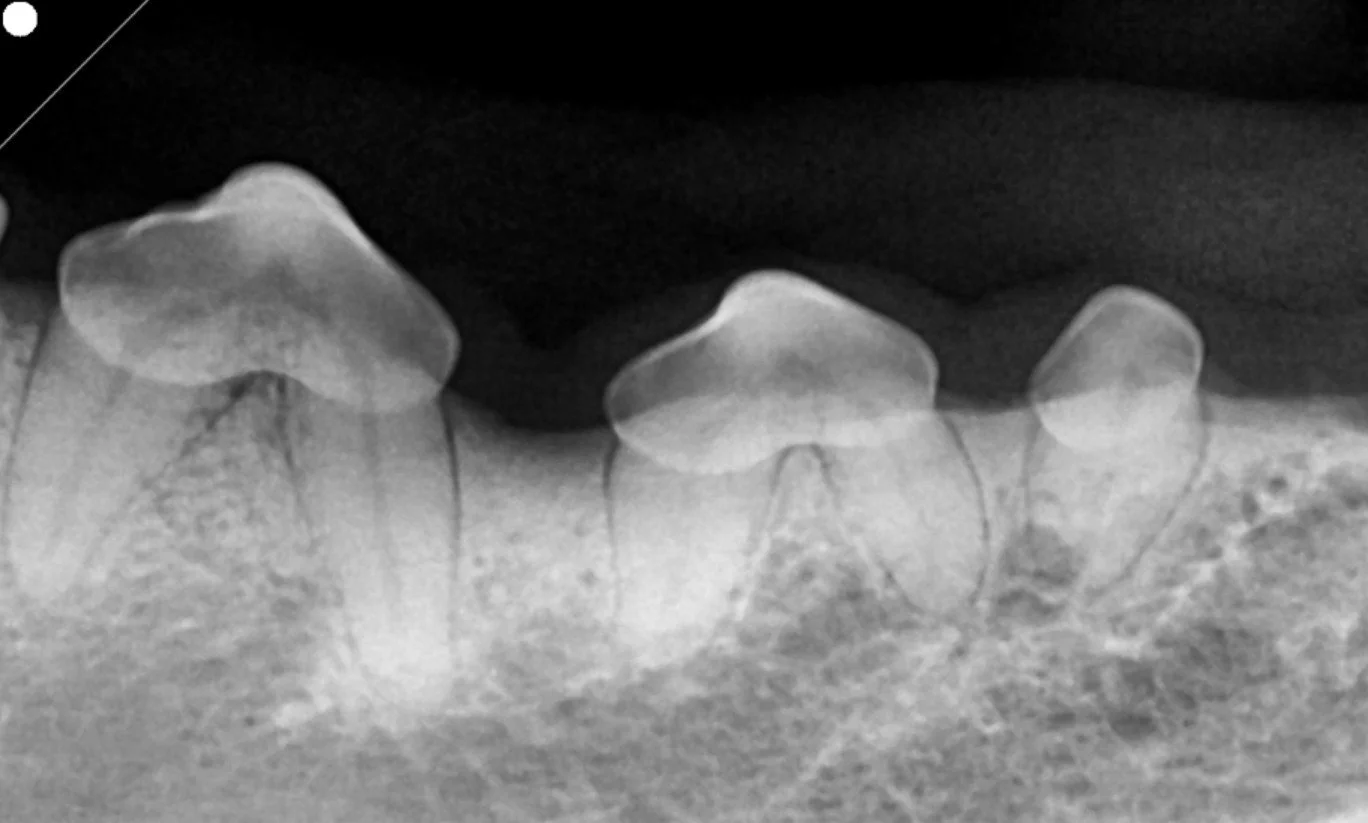
Dental X-rays to assess tooth roots and jaw bone.
This is the gold standard for treating and preventing dental disease.
At-Home Dental Care Makes a Big Difference
Between professional cleanings, daily or regular home care helps keep mouths healthy:
Brushing your pet’s teeth
Dental diets or chews
Water or food additives
Oral rinses
Our team is happy to help you find the best option for your pet. As a general guide, look for products that have been VOHC approved.
Watch Winny show us how toothbrushing is done!
Take a look in your pets mouth:
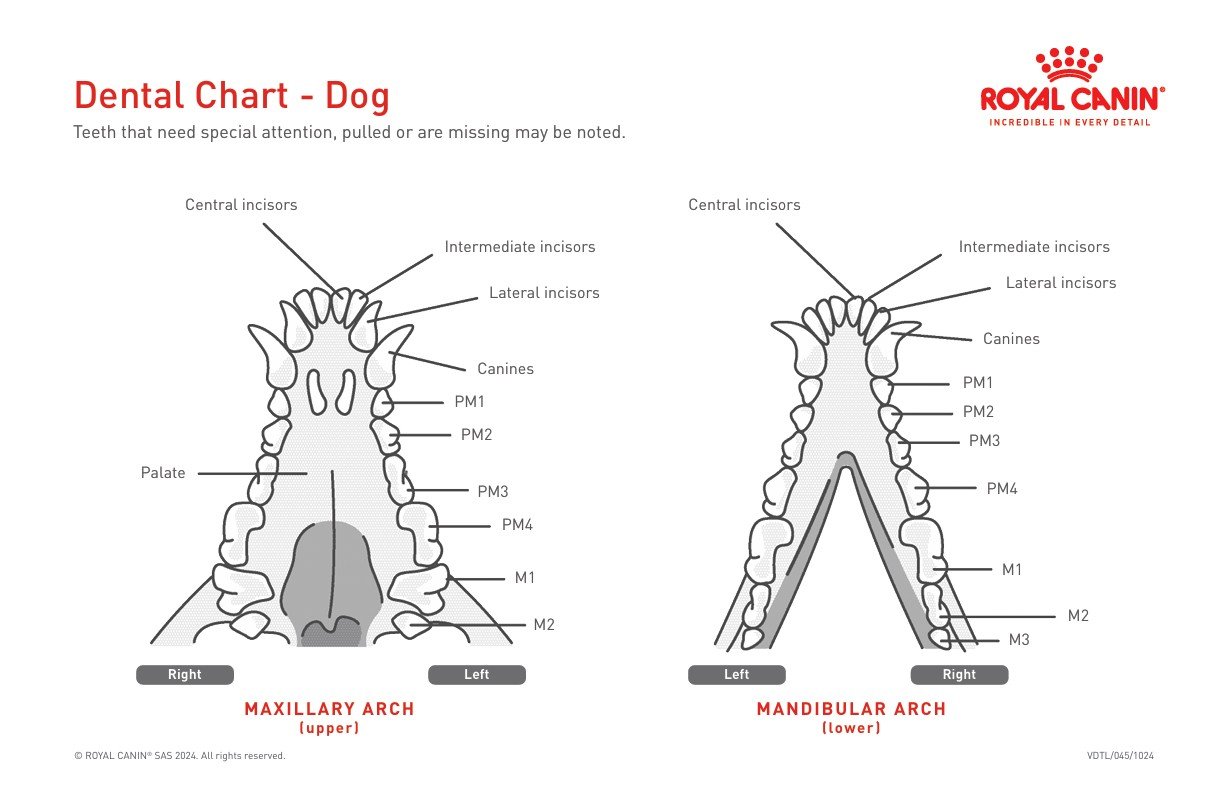
An adult dog has 42 teeth.
12 incisors – for nibbling and grooming
4 canines – the big “fangs” for holding and tearing
16 premolars – for shearing food
10 molars – for crushing and grinding
Puppies are different. They have 28 baby teeth, which usually start falling out around 3–4 months of age.

An adult cat has 30 teeth.
12 incisors – the tiny front teeth for grooming
4 canines – the sharp “fangs”
10 premolars – for slicing food
4 molars – for crushing
Kittens have 26 baby teeth, which start falling out around 3–4 months of age.
Fun fact: cats have fewer molars than dogs because their teeth are designed more for shearing meat than grinding.
Let’s Celebrate Dental Month Together
Dental Month is all about preventing pain, protecting health. A healthy mouth truly supports a healthier, happier life.
📞 Contact us today to book your pet’s oral health exam or to learn more about dental care options.
How to Videos
Cone of Confidence: Getting the Perfect Elizabethan Collar Fit
From Funky to Fresh: Cleaning Your Pet’s Ears
Eye Got This! Giving Eye Drops with Confidence
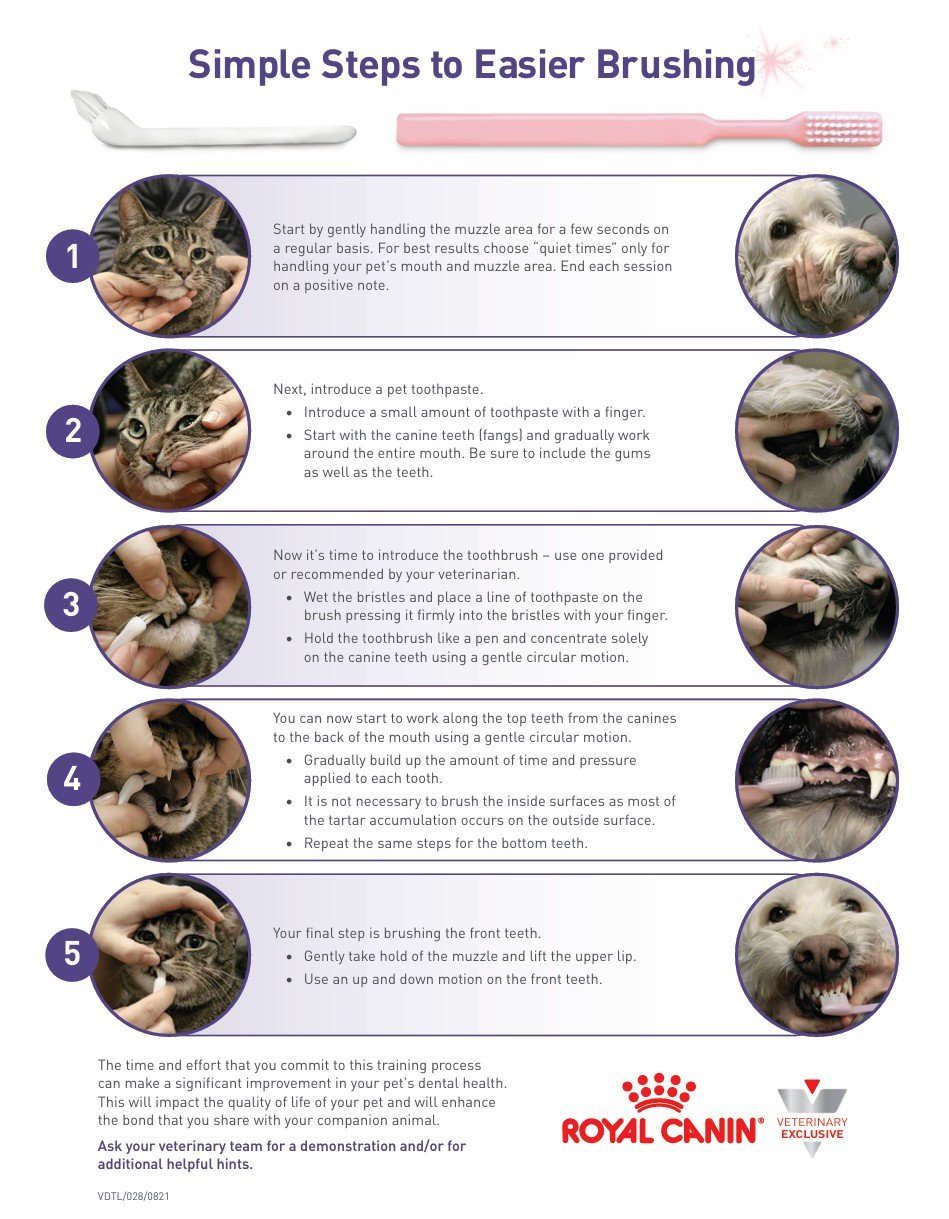
Kiss-Approved Smiles: how to brush your pets teeth
A Gentle Guide to Using the AeroKat Inhaler
End of Life Care
Here at Columbia Valley Veterinary Clinic we provide compassionate and professional veterinary care for in-home and in clinic humane euthanasia & consultation services.
For in clinic procedures, our family room is designated to provide comfort for you and your pet. With special soundproofing and a side exiting door, allowing a more private visit.
We can accommodate both in clinic and at home visits for end of life care.
Euthanasia provides a painless, peaceful end for an animal who would otherwise continue to suffer. Our team has received special training to provide your pet with a humane and gentle death. During the procedure, your veterinarian or technician will first inject your pet with a sedative, allowing them to become relaxed, and fall peacefully into a deep sedation sleep. Once we have reached a deep level of sedation, often an IV (intravenous catheter) is placed to give venous access, as the final injection has to go into a vein. The final injection stops the heart, and is an overdose of an anesthetic so the pet experiences no awareness of the end of life.
How do you know if your pet is in pain? An appointment with your veterinarian can help provide you with information about your pet that you may not know or recognize. We utilize a few different quality of life questionnaires that can help you assess how your pet is doing.
Pet quality of life (QOL) scales use a numerical basis for how your pet is feeling. A QOL quiz helps you address different variables in your pet’s life to assess their overall comfort and happiness. Quality of life scales are typically used when a pet has a terminal illness or is at an end of life stage.
A bucket list for your beloved pet allows you to spend precious time focusing on making memories with your furry companion. Many pet owners start bucket lists once a senior pet reaches their final days, or after they’ve been diagnosed with a terminal condition, such as untreatable cancer.
Bucket list:
https://twoheartspetlosscenter.b-cdn.net/wp-content/uploads/2022/07/Bucket-List-Final-2019.pdf
We use Tamarack Crematorium, a local crematorium service, which offers a wide variety of after care options for your pet; including cremation with ashes back, different urn options, or communal cremation where the ashes are spread under the Purcell mountains on their beautiful farmers field.

We believe that your pet deserves to depart with dignity and that is why we use Euthabags. Euthabag supports the AVMA Companion Animal Aftercare Policy that underlines the importance of sensitive handling of pets after their passing, proper containment of the pet. Euthabag is easily customizable with paint, markers, acrylic paint and even pens.
Visit their website for more information: https://www.euthabag.com/
The Ontario Veterinary College provides some additional resources for preparing for the loss of a pet, as well as coping with the loss of a pet. Visit this link for more information:
How to Bandage a Horse’s Leg for Swelling
Swelling in the horse's legs can come from many different factors and has multiple forms. The most common forms of this are stocking up and edema due to injury. Stocking up occurs due to impaired circulation, resulting in a pooling up of fluid. Although this may look alarming, it is normally not too serious and resolves itself quickly. Horses in the wild travel big distances, but domesticated horses often spend long periods of time standing or moving very minimally.
Because of this, horses that are stalled overnight or ones that are in smaller paddocks tend to stock up more easily. Horses with allergies, hoof care changes, obesity, dehydration or minimal exercise are prone to stocking up more often. Using standing wraps is often a useful way of helping the swelling to go down.
Standing Wraps: What do I need?
Pillows (No bow Wraps) or Large Gauze wraps, make sure your wraps are wide enough to go from the bottom of the knee to just below their fetlock.
Standing Bandages (often the shedrow ones work best), or vet wrap.
You may also use a liniment under the wrap, as long as there is no wound.
How to Wrap:
Start with pre-rolling your no bow wraps or large gauze pads up.
Place the end of the rolled up pad on the inner part of your horse's leg, with the bulk of it facing outwards.
Before you start to unroll your pads, make sure to always go forwards towards your horse's head, from the inside part of their leg first.
Start to unroll the wraps with even pressure, making sure there are no wrinkles or folds in it.
The finished No bow wrap/ Gauze pads, should be smooth and even.
Next, place the Standing bandages on the inner part of the horse's leg, with the bulk of it towards the outside, going forwards towards their head.
Ideally the placement of this should be about a quarter to a third of the way down from the top of the wrap. If the bandages are short then you can start closer to half way down instead.
Unroll the bandage, going downwards as it unravels. Always make sure you start on the inner part of the leg and go forwards first. Use gentle and even pressure, gently tightening every time you get to the cannon bone. Do not tighten the wrap as you go over the tendons (hind part of the leg) as you do not want to have too much tension and damage their tendons.
Overlap each wrap around by about a third to half of the width of the wrap.
Once you hit the bottom of the No bow wraps or Large gauze wraps, start to go back up the leg.
As the wrap comes to the end, make sure to keep the top of it even as you velcro it together.
Pitts, Laurie. “Standing Wrap How-To.” Practical Horseman, 14 Oct. 2020, practicalhorsemanmag.com/health/standing-wrap-how-to-14725/.
How to Bandage Wrap a Dog’s Foot
Different reasons for bandaging include:
A detached toenail
Burnt or scraped paw pad
Puncture wounds
Infections
Licking Prevention
Supplies Needed:
Non-stick gauze pads or telfa pads
Rolled gauze bandages
Adhesive bandages (such as vet wrap 4 inch)
Adhesive tape ( such as lightplast)
Clean cloths
Warm water
Gentle soaps (such as chlorhexidine, or a betadine wash)
Antibiotic ointment
Nail clippers
Cleaning the Wound:
Gently begin cleaning the wound with a damp, warm cloth or gauze pads.
Use the chlorhexidine or betadine wash to make sure you are getting any debris out. (make sure to dilute this with the proper ratio that is on the bottle).
Make sure to dry the foot well before bandaging as any trapped moisture may lead to more infections and irritations.
Applying the gauze pads:
If there is an open wound you will want to place your telfa pad on (keeping the plastic/shiny side of it towards the wound) first to make sure nothing sticks to it as it heals. Be sure to cover the entire wound with the telfa.
If you are using an ointment, apply this underneath the telfa pad. This will help to keep it from sticking, along with providing some microcrobrial protection.
Securing the gauze pads:
Using the rolled gauze, gently wrap around and over the telfa pads, overlapping each layer by at least half the width of the wrap. This will become the first layer.
Repeat this for a second time, starting at the dogs toes and working up their leg just past the wound. If there is swelling, continue up the entire leg.
Do not completely cover the tips of the toes, unless the nails have been trimmed as you may cause pressure sores.
Having two layers helps to keep the first telfa and gauze wraps in place, while alsohelping to reduce swelling.
Applying the Adhesive bandaging material:
Using the vet wrap, wrap your dog's foot starting at the toes, and going up to the point of the rolled gauze. Make sure to overlap this by at least half its width again.
Make sure not to wrap too tight as you do not want to cut off their circulation.
Secure the bandages using the adhesive tape (lightplast). Put one strip along the top of the wrap to hold it up, with another at the bottom of their foot for traction.
Tips for keeping the bandage on:
Have your dog wear a cone to keep them from chewing the bandages.
Put a waterproof bootie on when your dog goes outside to keep the bandage from getting wet.
If you leave the tips of your dog’s toes out, keep a close eye on them for any swelling.
Make sure you can fit two fingers in the wrap at all times for tightness.
Change the bandage regularly (every day or two).
Purely pets. “A Comprehensive Guide on How to Properly Wrap a Dog’s Paw.” Purelypetsinsurance.co.uk, Purely Pets, 2024, www.purelypetsinsurance.co.uk/blogs/a-comprehensive-guide-on-how-to-properly-wrap-a-dogs-paw/. Accessed 30 Oct. 2024.
Preparing Livestock and Pets for Wildfire: A Guide to Safety
Wildfire season is upon us, it's crucial to ensure the safety of our beloved animals. We hope this guide to help you prepare your livestock and pets:
1. Create an Emergency Plan
Evacuation Routes: Know safe routes for quick evacuation.
Safe Havens: Identify safe locations where you can take your animals, such as barns, fairgrounds, or animal shelters.
Transport Readiness: Keep vehicles and trailers ready for transportation.
2. Prepare Emergency Kits
For Pets:
Leashes, collars, and carriers
Food, water, and bowls
Medications and first aid supplies
Comfort items like blankets or toys
Copies of medical records and microchip information
For Livestock:
Halters and lead ropes
Food, water, and buckets
Medications and veterinary records
Identification tags or markers
3. Create a Defensible Space
Around Livestock Areas: Clear brush and flammable materials from barns and corrals.
For Pets: Keep pet enclosures and areas clear of debris.
4. Stay Informed
Monitor Weather and Fire Updates: Keep an eye on local news and weather channels.
Sign Up for Alerts: Enroll in local alert systems for timely notifications.
5. Have a Backup Plan
Neighbor Assistance: Coordinate with neighbors for help with evacuation if you're not home.
Alternative Shelters: Know alternative locations where you can temporarily house your animals.
Remember, your animals depend on you for their safety. Being prepared can make all the difference. Stay safe, and take action now to protect your furry and feathered friends. Stay safe!
Understanding Raw Food Diet for Pets
A raw food diet for pets typically includes uncooked meat, bones, organs, fruits, and vegetables. The goal is to mimic what animals might eat in the wild.
1. Types of Raw Diets
BARF (Biologically Appropriate Raw Food): Includes raw meat, bones, fruits, and vegetables.
Prey Model Raw: Focuses on whole prey animals and omits fruits and vegetables.
2. Perceived Benefits
Natural Diet: Mimics the natural diet of wild animals.
Dental Health: Chewing on raw bones can help clean teeth.
Improved Digestion: Some owners report better digestion and smaller stools.
Healthy Coat and Skin: Can lead to a shinier coat and healthier skin.
Increased Energy Levels: Pets may show increased vitality and energy.
3. Potential Risks
Increased Risk of Antibiotic Resistance: Exposure to bacteria in raw food can contribute to development of antibiotic-resistant infections, which can affect both pets and humans.
Nutritional Imbalance: Without proper knowledge, diets can be unbalanced and lack essential nutrients. This is especially important in growing animals, where an appropriate calcium-to-phosphorus ratio is critical for healthy bone development.
Bacterial Contamination: Raw food can carry bacteria like Salmonella, E. coli or Listeria, which can be harmful to pets and humans.
Bone Hazards: Bones can cause choking, blockages, and/or fractured teeth.
4. Safety Tips
Consult a Veterinarian: Always consult with your vet, or a veterinary nutritionist, before starting a raw diet.
Balanced Diet: Ensure the diet includes all necessary nutrients and supplements. Resources of supplements are listed below, to be used in combination with a veterinary nutritionist.
Hygiene: Practice good hygiene, such as washing and disinfecting hands, surfaces, and dishes thoroughly after each meal. Clean the muzzle of your pet after meal time.
Immune compromised: Do not feed if there are any people or animals in the household with a compromised immune system. This includes the young and old, as well as anyone on immune suppressants.
5. Monitoring Your Pet
Regular Check-ups: Schedule regular vet visits to monitor your pet’s health and dietary needs.
Observation: Keep an eye on your pet’s weight, coat condition, energy levels, and stool quality.
6. Common Myths
Bones are Always Safe: Bones are so hard they can cause fractured teeth and may have sharp edges which irritate or perforate the gastrointestinal system.
Raw Diets are Always Healthier: A raw diet isn't automatically healthier; it must be well-balanced and appropriate for the pet and household.
All Pets Thrive on Raw Food: Not all pets may benefit from a raw diet; individual needs vary.
7. Resources for Further Reading
CVMA Position
The Canadian Veterinary Medical Association (CVMA) finds there is compelling evidence for health risks to pets fed raw meat-based (RMB) pet food products, including raw meat-based diets (RMBD), and to humans who are in contact with such products or in contact with pets that consume them. The CVMA holds that the scientific evidence of animal and human health risks in feeding RMB pet food products outweighs any purported benefits.
Disclaimer
Always consult with your veterinarian before making significant changes to your pet’s diet. This information sheet is for educational purposes and not a substitute for professional veterinary advice.
How to Safely Give Your Pet Pills
Administering pills to pets can be a bit of a challenging task, but with the right approach, you can make the process smooth and stress-free for both you and your pet. Here are some tips to help you safely give your pet pills:
1. Consult Your Veterinarian
Dosage and Instructions: Ensure you understand the correct dosage and whether the medication should be given with food or on an empty stomach.
Special Instructions: Some pills cannot be crushed or split, so always check with your vet.
2. Use Treats
Hiding Pills in Food: You can also hide the pill in a small amount of food like cheese, peanut butter, or wet food. Make sure the entire pill is consumed.
Trick for Smart Pets: Give a treat first, then a treat with the pill, followed quickly by another treat. This encourages your pet to swallow the pill to get the next reward.
3. Manual Pill Administration
Hold Your Pet Securely: If your pet is small, wrap them in a towel to prevent movement. For larger pets, have someone help hold them still.
Open the Mouth: Gently tilt your pet's head back and open their mouth by pressing down on the lower jaw or gently squeezing behind the upper canine teeth.
Place the Pill: Place the pill as far back on the tongue as possible, then close the mouth immediately.
Encourage Swallowing: Gently stroke your pet’s throat or blow on their nose to encourage swallowing. You can also offer a small amount of water using a syringe (without a needle) to help the pill go down.
4. Be Positive and Calm
Use a Calm Tone: Speak softly and calmly to your pet to reduce their anxiety.
Reward Your Pet: After successfully administering the pill, give your pet a treat or praise to create a positive experience.
5. Observe Your Pet
Check for Compliance: Make sure your pet has swallowed the pill and hasn't spat it out. Watch for a few minutes after administration.
Monitor for Side Effects: Watch for any unusual reactions and contact your veterinarian if needed.
Additional Tips
Timing: Stick to a consistent schedule for giving medication.
Practice: If you're new to giving pills, practice with a small treat to get comfortable with the technique.
Pill Crushers and Splitters: If your vet approves, these tools can help make pills easier to administer, especially for pets that resist whole pills.
Pet Pillers/Poppers: This tool can be useful to help place the pill at the back of the throat with manual pill administration.
Always consult your veterinarian if you're having trouble administering medication or if you have any concerns about your pet's health.
How to Clean Your Pet's Ears Safely
Regular ear cleaning is essential for your pet's health and comfort. We hope this simple guide will help you clean your pet's ears safely:
1. Gather Your Supplies
Ear Cleaner: Use a vet-approved ear cleaning solution.
TrizEDTA Aqueous Flush
Non-stinging formula, making it gentle on sensitive ears.
Ideal for inflamed or ulcerated ears.
Safe for ruptured eardrums.
Effective for Pseudomonas infections.
MalAcetic Otic Cleaner
Great for preventing yeast infections in dogs prone to them.
Helps with greasy, waxy, or moist ears by cleansing and drying.
May be irritating in severely inflamed or ulcerated ears, so avoid in these cases.
Epiklean
Designed for maintenance of healthy ears.
Helpful for moist ears thanks to its gentle drying agent.
Suitable for routine ear care to keep ears clean and comfortable.
Cotton Balls or Pads: Can use cotton swabs for cleaning out cartilage grooves.
Towel: To keep your pet steady and clean up any mess.
2. Prepare Your Pet
Create a Calm Environment: Choose a quiet space and keep your pet relaxed.
Restraint: Gently hold your pet or have someone help you if needed.
3. Apply the Ear Cleaner
Lift the Ear Flap: Hold your pet’s ear flap upright and carefully squeeze the ear cleaner into the ear canal until it begins to pool.
Massage the Base: Gently massage the base of the ear to loosen debris and wax. You should hear a soft squishing sound—this means the solution is working.
4. Clean the Ear
Wipe Away Debris: Let your pet shake their head, then use a cotton ball or pad to remove any visible dirt or wax from the ear flap and outer ear canal.
Repeat if Necessary: If your pet's ears are very dirty, you may need to repeat the process.
5. Check for Signs of Infection
Check your pet’s ears regularly and look for:
Redness
Odor
Unusual discharge
If you notice any of these signs, contact your veterinarian, as they may indicate an ear infection or another underlying issue.
Tip: If discharge persists or builds up over the next day or two, this is a strong sign of an ear infection and warrants veterinary attention.
Chronic or recurrent ear infections may indicate an underlying condition, such as:
Allergies – to food or environmental factors
Hormonal diseases – like Cushing’s disease or hypothyroidism
Anatomical abnormalities – for example:
Thickened ear canals due to chronic inflammation
Narrow ear canals, as seen in breeds like Shar Peis
6. Reward Your Pet
Give Treats and Praise: Reward your pet with treats and praise to create a positive association with ear cleaning.
Important Tips
Frequency: Clean your pet's ears as recommended by your vet, usually once a month or as needed.
Avoid Over-Cleaning: Over-cleaning can irritate your pet's ears, so only clean them when necessary.
Consult Your Vet: Always consult your vet before using any new ear-cleaning product.
Regular ear cleaning can help prevent infections and keep your pet comfortable. Remember, if you're unsure about how to clean your pet's ears or if they have chronic ear issues, please give us a call to book an appointment with one of our team.
A Little Squish, A Little Swish: Ear Cleaning 101 Video
How to Remove a Tick
Ticks can carry diseases that affect your dog’s health, so it’s important to remove them safely and monitor your pet afterward. Follow these steps to ensure proper removal and care.
Preparation
Before you begin, gather the following supplies:
Tweezers or a tick removal tool
Rubbing alcohol
A Ziploc bag
Rubber gloves
Disinfectant or antibiotic cream (available from your veterinarian)
Removal
Put on your rubber gloves.
If using tweezers:
Grasp the tick as close to your dog’s skin as possible.
If using a tick removal tool:
Gently press the tool against your dog’s skin near the tick.
Slide the notch of the tool underneath the tick.
Slowly and steadily pull the tick out of your dog’s skin.
Avoid twisting, squeezing, or crushing the tick, as this can leave the head embedded in the skin.
After Care
Place the tick in a Ziploc bag with rubbing alcohol and leave it for 24 hours to ensure it is killed.
Wash your hands thoroughly.
Note the location and date you found the tick.
Apply disinfectant or antibiotic cream to the bite site.
Clean your tweezers or tick removal tool with rubbing alcohol.
Consider submitting the tick for identification through eTick to help track tick-borne disease risks in your area.
Watch for symptoms of tick-borne illnesses
Contact your veterinarian immediately if your dog develops any of the following symptoms after a tick bite:
Joint pain or stiffness
Lethargy or weakness
Weight loss
Decreased appetite or thirst
Redness or inflammation at the bite site
Neurological issues (e.g., tremors, incoordination)
Prevention
Preventing tick bites is the best way to keep your animal healthy. Your veterinarian can recommend effective tick prevention products such as:
Bravecto – protects against ticks and fleas for several months
Other approved topical or oral tick preventatives
Additional prevention tips:
Avoid areas with tall grass, heavy brush, or dense wooded areas where ticks are common.
Check your pet regularly for ticks, especially after walks in high-risk areas.
Keep your yard maintained by trimming grass and removing leaf litter where ticks may hide.
Using a combination of preventative products and regular tick checks greatly reduces your pet’s risk of tick-borne illness.
Tips and Tricks to Apply Eye Medication
Eye medications are commonly prescribed to treat conditions such as infections, inflammation, injuries, or dry eye. Applying eye medication can sometimes feel challenging, but with a few simple techniques, it can become much easier and less stressful for both you and your pet.
1. Preparation
Before starting, gather all the supplies you will need:
Your pet’s eye medication
Clean tissues or cotton pads
Treats or rewards for your pet
A calm, well-lit area
Always wash your hands before and after applying medication to prevent introducing bacteria to the eye.
2. Applying the eye drops
Gently wipe away any debris around the eye using a warm, damp washcloth before applying the medication.
Hold the eye drop bottle between your thumb and index finger. For better control, you can rest the side of your hand on the top of your pet’s head for stability.
With your other hand, gently pull down the lower eyelid using your thumb. This will create a small pocket or pouch to hold the drops.
Hold the bottle close to the eye without touching the eye or eyelids.
Squeeze the prescribed number of drops into the eye, aiming for the center.
Release your pet’s head and allow them to blink naturally.
Blinking will spread the medication across the surface of the eye.
For horses: A 1 mL syringe with the needle removed can sometimes be used to administer eye drops from a short distance. Please contact your veterinarian for guidance before using this method.
3. Applying the eye ointment
Gently wipe away any debris around the eye using a warm, damp washcloth before applying the medication.
Apply a thin strip of the ointment onto your clean finger or a cotton swab (Q-tip).
With your other hand, gently pull down your pet’s lower eyelid using your thumb. This will create a small pouch to hold the ointment.
Carefully roll or place the ointment from your finger or cotton swab into the lower eyelid pouch.
Release the eyelid and allow your pet to blink, which will help spread the ointment across the surface of the eye.
Tips
If your pet’s eye is painful or sensitive, you may need an extra person to help gently hold them still.
Large dogs can be positioned in a corner for support.
Small dogs or cats can be swaddled in a blanket to keep them calm and secure.
Always keep the applicator tip clean. Avoid touching the eye, eyelid, or any other surface with the tip to prevent contamination.
If the applicator does accidentally touch the eye or another surface, wipe it clean with a clean cloth. For specific cleaning instructions, check with your veterinarian.
In the Blink of an Eye: How to Give Eye Drops
How to Collect a Dog’s Stool Sample at Home
Your veterinarian may ask you to bring a stool (fecal) sample to your pet’s appointment. Testing a stool sample helps us check for intestinal parasites, bacteria, and other digestive issues that may be affecting your dog’s health.
Collecting a stool sample at home is simple and only takes a few minutes.
1. Preparation
Before collecting your dog’s stool sample, gather the following supplies:
Plastic gloves for hygiene.
A plastic Ziploc bag, poop bag, or sealable container. Your veterinarian may also provide a specific container to use.
A plastic disposable spoon to help transfer the stool into the container.
A pen or marker for labeling the sample.
Having these items ready ahead of time will make the collection process quick and easy when your dog goes to the bathroom.
2. Guidance
Grab your poop bag or Ziploc bag and flip it inside out over your hand.
Put your dog on a leash and take them outside as you normally would. If your dog will not defecate while on a leash, you can allow them off leash, but stay close to ensure you collect the correct sample.
Once your dog has finished, collect the feces using the poop bag, or use a plastic disposable spoon to transfer a small portion into a sealable container provided by your veterinary clinic.
Seal the bag or container tightly. If possible, bring the sample directly to your veterinary clinic. If you cannot bring it immediately, store it in the refrigerator until you are able to drop it off. Fresh, uncontaminated samples provide the most accurate results.
Label the bag or container with:
Your name
Your dog’s name
The date and time the sample was collected
Try to avoid any contact between the feces and urine, as this can contaminate the sample and affect test results.
How to Collect a Dog’s Urine Sample at Home
Sometimes your veterinarian may ask you to collect a urine sample from your pet at home before an appointment. This can help us diagnose conditions such as urinary tract infections, bladder stones, kidney disease, diabetes, and other health concerns.
1. Preparation
Before collecting your pet’s urine sample, gather the following supplies:
A clean container to catch the urine. A short, shallow dish or a soup ladle works well for most dogs.
If you expect to collect samples regularly, you may prefer to use a purpose-built collection device such as the iNenya Dog Urine Sample Catcher which can be purchased online.
Disposable plastic gloves for hygiene.
A pen to label the sample.
The urinalysis container provided by your veterinary clinic.
A syringe or small funnel to help transfer the urine from the collection dish into the urinalysis container.
Having everything ready before your pet goes outside will make the collection process much easier and help ensure a clean sample.
2. Collection guidance
Once everything is prepared, ensure all equipment is clean and completely dry to prevent contamination of the sample. In winter, try to prevent snow or debris from entering the sample.
Check whether your veterinarian has recommended a specific collection time, and try to collect the sample as close to that time as possible.
Put on plastic gloves if you have them. If not, be sure to wash your hands before and after collecting the sample.
Attach your dog’s leash and take them to their usual outdoor bathroom area.
Wait until your dog begins to urinate, then calmly and quickly place your collection dish or ladle into the stream to catch a small amount.
Once collected, transfer the urine into the urinalysis container provided by your veterinary clinic using a syringe or funnel if needed.
Label the container with:
Your name
Your dog’s name
The date and time the sample was collected
If possible, bring the sample to the veterinary clinic right away. If you are unable to do so immediately, store the sample in the refrigerator until you can drop it off.
3. Tips
Ask your veterinarian ahead of time how much urine is needed for the sample. In most cases, only a small amount is required.
Try to collect the sample all at once, rather than combining several small samples from multiple urinations.
If you are having difficulty collecting a urine sample at home, please contact our clinic. We can collect a sample at the hospital using a sterile technique called Cystocentesis, which involves obtaining urine directly from the bladder. This method allows us to collect a clean sample for accurate testing.